 Quick View
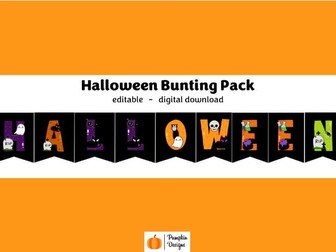
Halloween Letter Bunting
Create a classroom that you love using the Halloween Bunting.
Once purchased the resource you will receive a Microsoft PowerPoint document which has the lettering and numbers on black bunting. The colour of the bunting can be changed to suit your needs. The lettering and numbers can also be resized if you wish.
PLEASE NOTE: This is a digital product, no physical products will be sent.
What is included in the PowerPoint document?
2 pieces of bunting on each slide (please see photos for an example of what each slide looks like.
Clear instructions on how to edit the resource.
What will you need to access this document?
An up to date version Microsoft PowerPoint, a free trial for 1 month can be found here https://www.microsoft.com/en-us/microsoft-365/try .
What do you need to know before purchasing this document?
The lettering and numbers are individual images. The font cannot be changed however they can be resized.
All letters are in uppercase.
Due to variations in monitor colours/brightness and printer ink/quality the printed product may differ slightly from the image on the screen. I suggest printing one of the preview images from the listing so you are able to see what the product will look like when printed.
No refunds are given for digital products.