Specific Heat Capacity lessonQuick View
MC_AfriqueMC_Afrique

Specific Heat Capacity lesson

(1)
Specific heat capacity lesson, including equation of specific heat capacity definition with calculation questions and answers, plus internal energy definition physics. The lesson objectives are as follows: Define internal energy and how it is affected by heat, state the factors that affect the change in thermal energy of a system and apply the equation and the concept of specific heat capacity to problems. The slides are fully animated and include answers to every mini plenary question and exam question. The breakdown of the slides is as follows: Slide 1 - Title and 5-minute starter. The starter is a grid of four questions entitled ‘last week, last lesson, today’s learning and future learning’. Use this generic slide for all of your lessons by simply changing the questions and the answers each time. Slide 2 - Lesson objectives (see above) Slide 3 - Recap of definition of system and introduction to definition of internal energy Slide 4 - Explanation of what happens to the internal energy when heat is applied to the system 
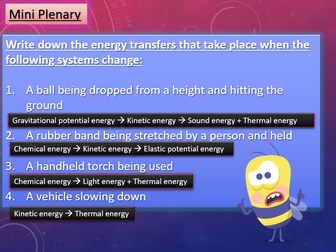
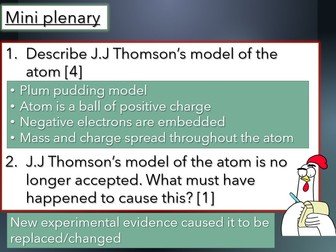
Slide 5 - Mini plenary. 4 questions of increasing difficulty that test definitions and explanations that students have just learnt. Answers animate onto the screen Slide 6 - Introduction to the factors that affect the change in thermal energy of a system Slide 7 - Mini plenary. Random name animation used to test pupils’ recall of the factors that affect the change in thermal energy in a system Slide 8 - Introduction to specific heat capacity equation with the units. All parts animate onto the screen at your leisure 
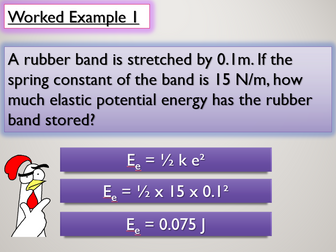
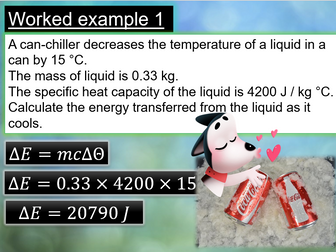
Slide 9 - Worked example 1 SHC calcuation with step-by-step answer animation Slide 10 - Worked example 2 SHC calcuation with step-by-step answer animation 
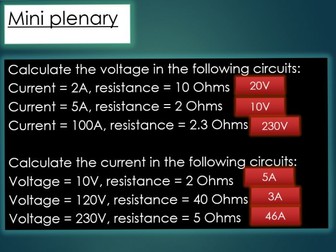
Slide 11 - Mini plenary. SHC calculation 3-mark exam question with mark scheme answer animating onto screen. Slide 12 - Explanation of why specific heat capacity is important, linking to its definition, i.e. useful to know as it can help people decide the best materials to use for buildings or cooking utensils Slide 13 - Comparison of SHC of iron and SHC of wood. Iron’s SHC is much lower - what does this actually mean? All explained on this slide, which will help students frame their knowledge in a relevant context. Slide 14 - Mini plenary to test last lesson objective (apply the concept of specific heat capacity to problems) Slide 15 - ALT (Applied learning time). 6 mark synthesis exam question: “A student investigated the specific heat capacity of metals. Describe an experiment the student could do to measure the specific heat capacity of a metal.” Guidance animates onto the screen and then disappears, such as the need for a joulemeter. Slide 16 - Plenary. Short 3-mark SHC calculation question Follow me on Twitter https://twitter.com/MC_Afrique If you have a positive experience with the resource please leave a positive review!
Energy stores and systems lessonQuick View
MC_AfriqueMC_Afrique

Energy stores and systems lesson

(1)
Energy stores and systems GCSE Physics lesson including worked examples of energy transfers with answers, energy change diagrams, system definition, and what happens to the energy when the system changes. The lesson objectives are as follows: Define, with examples, what a system is, explain how a system can be changed and recall the main energy stores and explain what happens to the energy when a system changes. The slides are fully animated and include answers to every mini plenary question and exam question. The breakdown of the slides is as follows: Slide 1 - Title and 5-minute starter. The starter is a grid of four questions entitled ‘last week, last lesson, today’s learning and future learning’. Use this generic slide for all of your lessons by simply changing the questions and the answers each time. Slide 2 - Lesson objectives (see above) Slide 3 - System definition with examples Slide 4 - Mini plenary. Random name animation used to test pupils’ recall of system definition Slide 5 - Introduction to the three ways a system can be changed with an example of a man kicking a ball (Heating, work done by a force and work done when current flows). Slide 6 - Mini plenary question: “This filament light bulb has just been switched on. How does this demonstrate a system being changed?” Answer animates directly onto screen Slide 7 - Introduction to what happens to the energy when a system changes (When a system changes, energy is transferred from one energy store to another) Slide 8 - KS3 recap of the main energy stores with photos to make the lesson more visual Slide 9 - Example of energy transfer when an object is projected upwards. Answer animates as flow diagram with photo to make the lesson more visual Slide 10 - Example of energy transfer when a moving object hits an obstacle. Answer animates as flow diagram with photo to make the lesson more visual Slide 11 - Example of energy transfer when bringing water to boil in an electric kettle. Answer animates as flow diagram with photo to make the lesson more visual Slide 12 - Mini plenary. Write down the energy transfers that take place when the following systems change: A ball being dropped from a height and hitting the ground A rubber band being stretched by a person and held A handheld torch being used A vehicle slowing down Answers animate onto the screen as always Slide 13 - ALT (Applied learning time). 3 mark exam question: Explain the energy changes in a book as it is resting on a shelf compared to when it is falling and hits the ground. Answer animates by paragraph onto the screen This stage of the lesson is an opportunity for pupils to apply what they have learnt in the lesson Slides 14-16 - Plenary. Short 1 and 2 mark exam questions with animated answers to wrap up an outstanding lesson and address any lingering misconceptions Don’t forget to leave a positive review! https://twitter.com/MC_Afrique
Electrolysis of aqueous solutions lesson with questions and answersQuick View
MC_AfriqueMC_Afrique

Electrolysis of aqueous solutions lesson with questions and answers

(1)
Electrolysis of aqueous solutions and electrolysis of ionic compounds with half equations. Lesson objectives: Predict the products of the electrolysis of binary ionic compounds in the molten state, write half equations for the reactions occurring at the electrodes during electrolysis and predict the products of the electrolysis of aqueous solutions containing a single ionic compound. This lesson follows on from the introduction lesson to electrolysis that can be found here. All the slides in this lesson are fully animated and include answers to every mini plenary question and exam question. The breakdown of the slides is as follows: Slide 1 - Title and 5-minute starter. The starter is a grid of four questions entitled ‘last week, last lesson, today’s learning and future learning’. Use this generic slide for all of your lessons by simply changing the questions and the answers each time. Slide 2 - Lesson objectives (see above) Slide 3 – Recap slide from previous lesson on what happens when an ionic compound is melted or dissolved in water, i.e. the ions are free to move about within the liquid or solution Slide 4 – An explanation of what you would see at each electrode during the electrolysis of molten sodium chloride, i.e. bubbles of chlorine gas at positive electrode and sodium metal coating the negative electrode Slide 5 – Mini plenary/learning pit stop. Three questions of increasing difficulty to check students’ understanding thus far. Answers animate onto the screen. Slide 6 – Introduction to half equations, the golden rule (Positive ions gain electrons to form elements and negative ions lose electrons to form elements) and OIL RIG all covered here Slide 7 – Worked example of electrolysis of molten sodium chloride. Half equations animate onto the screen Slide 8 – List of diatomic elements presented to students in the form of useful mnemonic (Have No Fear Of Ice Cold Beer) Slide 9 – Exam-style question worth 4 marks: A student performs electrolysis of molten magnesium chloride. Predict the products at each electrode and write half equations for each electrode. Answers animate onto the screen as you click the mouse. Slide 10 – Introduction to the electrolysis of aqueous solutions with mention of hydroxide and hydrogen ions from the water Slide 11 – Diagram of electrolysis of aqueous sodium chloride solution showing all the ions present Slide 12 – Golden rules to help students work out the products at each electrode: Hydrogen is produced at the negative electrode IF the metal is more reactive than hydrogen and Oxygen is produced at the positive electrode unless the solution contains halide ions, in which case the halogen is produced. Slide 13 – Solutions given for the products at each electrode for the electrolysis of aqueous sodium chloride solution using the golden rules Slide 14 – Special mention for the half equation for the oxidation of hydroxide ions to form oxygen and water, as this one is particularly difficult. Slide 15 - Exam
Electrolysis Introduction with questions and answersQuick View
MC_AfriqueMC_Afrique

Electrolysis Introduction with questions and answers

(1)
Electrolysis Chemistry lesson including the process of electrolysis and using electrolysis to extract metals. Lesson objectives are: define an electrolyte, explain what happens when an electric current is passed through an electrolyte and explain how electrolysis can be used to extract metals from molten compounds. The slides are fully animated and include answers to every mini plenary question and exam question. The breakdown of the slides is as follows: Slide 1 - Title and 5-minute starter. The starter is a grid of four questions entitled ‘last week, last lesson, today’s learning and future learning’. Use this generic slide for all of your lessons by simply changing the questions and the answers each time. Slide 2 - Lesson objectives (see above) Slide 3 - Introduction to what happens to an ionic compound when it is melted or dissolved in water. Simple, clear, pencil-sketch diagram of beakers containing solid sodium chloride and the stages in becoming sodium ions animates on to screen Slide 4 - Definition of electrolytes given Slide 5 - Mini plenary. Three questions of increasing difficulty. Answers animate onto the screen Slide 6 - Introduction to electrolysis process using example of molten sodium chloride. Simple, clear, sketch diagram of beaker with electrodes, cell, wires and molten sodium chloride. Students are shown on this slide that the electrodes are made of carbon. Slide 7 - Explanation, with use of a diagram, of the movement of ions that take place when an electric current is passed through the molten sodium chloride, i.e. positive ions move towards the negative electrode, etc. Slide 8 - Explanation, with use of a diagram, of what happens at each electrode, i.e. positive ions are discharged at the negative electrode, producing the element, etc. Slide 9 - Mini plenary. Two questions of increasing difficulty. Answers animate onto the screen Slide 10 - Introduction to reactivity series with useful mnemonic and which metals must be extracted from their ores using electrolysis Slide 11 - Explanation as to why a lot of energy is needed to perform electrolysis of molten compounds to extract the metal Slide 12 - Introduction to the example of extracting aluminium from aluminium oxide, including why cryolite is added to the elctrolyte Slide 13 - Mini plenary. Pupils asked to draw a labelled diagram of the electrolysis of molten aluminium oxide Slide 14 - Mini plenary review reveals diagram of apparatus and also explains what happens at each electrode, i.e. aluminium ions are discharged at the negative electrode, producing the element aluminium Slide 15 - Think-pair-share based on the following question: In the electrolysis of aluminium oxide, the positive electrode must be continually replaced. Why do you think this is? Slide 16 - Explanation, with use of diagram, as to why the positive electrode must be continually replaced. Slide 17 - Follow me on Twitter https://twitter.com/MC_Afrique
Waste water treatment GCSE Chemistry lessonQuick View
MC_AfriqueMC_Afrique

Waste water treatment GCSE Chemistry lesson

(1)
Waste water treatment potable water diagram with steps. Urban lifestyles and industrial processes produce large amounts of waste water that require treatment before being released into the environment. Sewage and agricultural waste water require removal of organic matter and harmful microbes. Industrial waste water may require removal of organic matter and harmful chemicals Lesson objectives: State sources of waste water, Explain the steps involved in the treatment of sewage, comment on the relative ease of obtaining potable water from waste, ground and salt water. This lesson follows on from the potable water lesson here https://www.tes.com/teaching-resource/potable-water-lesson-12502600. All the slides in this lesson are fully animated and include answers to every mini plenary question and exam question. The breakdown of the slides is as follows: Slide 1 - Title and 5-minute starter. The starter is a grid of four questions entitled ‘last week, last lesson, today’s learning and future learning’. Use this generic slide for all of your lessons by simply changing the questions and the answers each time. Slide 2 - Lesson objectives (see above) Slide 3 – Intro to urban lifestyles and industrial processes Slide 4 – Hinge question: Can you name specific examples of sources of waste water? Slide 5 – Source 1 of waste water – domestic Slide 6 – Source 2 - agricultural Slide 7 – Source 3 - industrial Slide 8 – Mini plenary questions, answers animate on screen Slide 9 – Steps involved in treating waste water: Step 1 - Screening Slide 10 – Step 2 - Sedimentation Slide 11 – Step 3 – Anaerobic digestion Slide 12 – Step 4 – Aerobic biological treatment Slide 13 – Solutions given for the products at each electrode for the electrolysis of aqueous sodium chloride solution using the golden rules Slide 14 – Special mention for the half equation for the oxidation of hydroxide ions to form oxygen and water, as this one is particularly difficult. Slide 15 – ALT (Applied learning time). 6 mark exam style question, designed to test students’ understanding of the whole lesson. Answers animate onto the screen. Slide 16 – Plenary. Cold call questions which animate onto the screen with pupils’ names attached as a final check that learning has taken place and that you have done your job! Follow me on Twitter https://twitter.com/LyricalPedagog If you have a positive experience with the resource please leave a positive review!
Elastic potential energy lessonQuick View
MC_AfriqueMC_Afrique

Elastic potential energy lesson

(1)
Elastic potential energy lesson with questions and answers. Lesson objectives are: State what the limit of proportionality is, describe what elastic potential energy is and explain what extension is and apply the equation for elastic potential energy. The slides are fully animated and include answers to every mini plenary question and exam question. The breakdown of the slides is as follows: Slide 1 - Title and 5-minute starter. The starter is a grid of four questions entitled ‘last week, last lesson, today’s learning and future learning’. Use this generic slide for all of your lessons by simply changing the questions and the answers each time. Slide 2 - Lesson objectives (see above) Slide 3 - Introduction to elasticity and its meaning Slide 4 - Definition of limit of proportionality Slide 5 - Mini plenary. Random name animation used to test pupils’ recall of limit of proportionality definition Slide 6 - Definition of elastic potential energy Slide 7 - Mini plenary. Pupils are asked to describe scientifically what an image is showing (a sling shot being pulled back and launching a stone). Answer animates onto screen - elastic potential energy being transferred to kinetic energy Slide 8 - Introduction to elastic potential energy equation with units Slide 9 - Explanation of what extension is and how to calculate it (some questions do not state the extension in an obvious way) Slide 10 - Elastic potential energy worked example 1 (answer animates onto screen in stages) Slide 11 - Elastic potential energy worked example 2 (answer animates onto screen in stages) Slide 12 - ALT (Applied learning time). Differentiated elastic potential energy calculation questions (9 in total). Gold, silver and bronze levels of difficulty (Silver and gold require pupils to rearrange the equation) Slide 13 - ALT review - all answers animate onto screen Slide 14 - Plenary. Elastic potential energy GCSE exam calculation. Answer animates onto the screen in stages Follow me on Twitter https://twitter.com/MC_Afrique If you have a positive experience with the resource please leave a positive review!
Biodiversity and Waste management lessonQuick View
MC_AfriqueMC_Afrique

Biodiversity and Waste management lesson

(1)
Biodiversity definition and waste management GCSE Biology with questions and answers. Includes how waste has an impact on biodiversity. AQA combined science 4.7.3.1 and 4.7.3.2 slides are animated and include answers to all the questions. The lesson ends with GCSE exam questions with answers that animate on the screen
V=IR Lesson with questions and answers GCSE PhysicsQuick View
MC_AfriqueMC_Afrique

V=IR Lesson with questions and answers GCSE Physics

(0)
GCSE Combined Science lesson for the AQA specification with** V=IR questions and answers/Ohm’s law questions and answers**. Includes potential difference, current and resistance definitions, mini plenary questions with answers, and ALT (Applied Learning Task) at the end. The PowerPoint is fully animated and includes GIF animations for easier explanations. The AQA specification point that this lesson covers is 6.2.1.3 Follow me on Twitter https://twitter.com/MC_Afrique
Potable water lessonQuick View
MC_AfriqueMC_Afrique

Potable water lesson

(0)
Potable water GCSE Chemistry lesson AQA combined science, including difference between potable water and pure water, treatment of sea water and freshwater to produce potable water, with questions and answers throughout. The lesson objectives are as follows: Distinguish between potable water and pure water, describe the differences in treatment of ground water and salty water and** justify** the steps used to produce potable water. The slides are fully animated and include answers to every mini plenary question and exam question. The breakdown of the slides is as follows: Slide 1 - Title and 5-minute starter. The starter is a grid of four questions entitled ‘last week, last lesson, today’s learning and future learning’. Use this generic slide for all of your lessons by simply changing the questions and the answers each time. Slide 2 - Lesson objectives (see above) Slide 3 - Introduction to the importance of water and what constitutes safe, drinking water Slide 4 - Definition of potable water presented Slide 5 - Concept of pure water introduced (Pure water contains water molecules and no other dissolved substances). A photo of a bottle of Evian water is used as the discussion point: Is this bottle of mineral water pure? Answer animates onto screen: No, as it contains other dissolved ions, e.g. potassium, nitrates and sodium Slide 6 - Mini plenary. 3 questions testing pupils’ understanding of the difference between potable water and pure water. Answers animate onto the screen Slide 7 - This slide introduces the question: How is potable water produced in the UK? Slide 8 - Steps involved to produce potable water from freshwater, including selection of appropriate source of freshwater, definition of freshwater, filter beds and sterilising with chlorine, ozone or UV Slide 9 - Parched photo of Sahara desert to introduce the question: How is potable water obtained in countries like Saudi Arabia where there are no rivers or lakes? Slide 10 - Steps involved to produce potable water from seawater, including desalination, distillation and reverse osmosis. Slide 11 - Mini plenary. 4 questions testing pupils’ understanding of the steps involved in producing potable water from freshwater and seawater. Answers animate onto the screen Slide 12-16 - Exam questions on potable water with answers animating onto the screen from the mark scheme. The last question is worth four marks, which could be useful for extended writing Follow me on Twitter https://twitter.com/MC_Afrique If you have a positive experience with this resource please leave a positive review!
Contraception lesson GCSE BiologyQuick View
MC_AfriqueMC_Afrique

Contraception lesson GCSE Biology

(0)
Contraception GCSE Science lesson with questions and answers. Includes hormonal and non-hormonal methods of contraception and evaluating the use of contraceptives. Lesson covers all the specification points forAQA Combined Science/Biology 4.5.3.5. The slides are fully animated and include answers to every mini plenary question and exam question.
Carbon cycle with questions and answersQuick View
MC_AfriqueMC_Afrique

Carbon cycle with questions and answers

(0)
Carbon cycle diagram, carbon cycle steps and carbon cycle definition. GCSE Biology Lesson objectives: Explain the importance of carbon to living organisms, explain how the carbon cycle returns carbon from organisms to the atmosphere and explain the role of microorganisms in cycling carbon through ecosystems. The slides are fully animated and include answers to every mini plenary question and exam question. The breakdown of the slides is as follows: Slide 1 - Title and 5-minute starter. The starter is a grid of four questions entitled ‘last week, last lesson, today’s learning and future learning’. Use this generic slide for all of your lessons by simply changing the questions and the answers each time. Slide 2 - Lesson objectives (see above) Slide 3 - Introduction to plants as producers, including photosynthesis and brief explanation of the food chain in relation to the compounds made by plants Slide 4 – Addressing the question: Why is carbon important to living organisms? Slide 5 - Mini plenary. Three questions of increasing difficulty to test learning so far. Answers animate onto the screen. Slide 6 - Introduction to the carbon cycle definition Slide 7 – Detailed, labelled pencil-drawing of the carbon cycle. Pupils will copy this into their book. Each arrow of the cycle is numbered and the numbers animate onto the screen in sequence in a prescribed order. This serves as a guide for pupils to know the sequence in which they should copy the diagram. It will also allow you to explain each stage of the cycle. Please note ‘carbon in animals’ appears twice as primary consumers eat plants and secondary consumers eat the primary consumers Slide 8 - Mini plenary. Four questions of increasing difficulty to test learning so far. Answers animate onto the screen. Slide 9 – Introduction to decomposers and what their role is in the carbon cycle Slide 10 -Explanation of how microorganisms contribute positively to the carbon cycle Slide 11 - Mini plenary. Two questions of increasing difficulty to test learning so far. Answers animate onto the screen. Slide 12 – ALT (Applied Learning Time). 6-mark exam question. Mark scheme animates onto the screen Slide 13 – Plenary. Cold-call style questions with pupil’s name attached to ensure learning has taken place Follow me on Twitter https://twitter.com/MC_Afrique If you have a positive experience with the resource please leave a positive review!
Development of the model of the atom lesson with questions and answersQuick View
MC_AfriqueMC_Afrique

Development of the model of the atom lesson with questions and answers

(0)
Development of the model of the atom GCSE Physics lesson including J.J Thomson, Ernest Rutherford, plum pudding model, nuclear model, alpha particle scattering experiment (gold foil experiment), with questions and answers throughout the lesson. The lesson objectives are as follows: Explain why the discovery of the electron led to a new model for the atom and describe this new model, explain why the new evidence from the scattering experiment led to a change in the atomic model and explain the difference between the plum pudding model of the atom and the nuclear model of the atom. The slides are fully animated and include answers to every mini plenary question and exam question. The breakdown of the slides is as follows: Slide 1 - Title and 5-minute starter. The starter is a grid of four questions entitled ‘last week, last lesson, today’s learning and future learning’. Use this generic slide for all of your lessons by simply changing the questions and the answers each time. Slide 2 - Lesson objectives (see above) Slide 3 – Open question: what does an atom look like? John Dalton’s atomic model is mentioned here Slide 4 – Introduction to J.J. Thomson and new experimental evidence may lead to an existing model being changed or replaced Slide 5 – Explanation of the plum pudding model Slide 6 – Mention of Hantaro Nagaoka, a Japanese scientist who disagreed with Thomson’s plum pudding model. Inclusion of Nagaoka provides an opportunity to diversify the curriculum. Slide 7 - Mini plenary. Three questions of increasing difficulty. Answers animate onto the screen Slide 8 – Information about Ernest Rutherford and description of gold foil experiment Slide 9 – Explanation of Rutherford’s results Slide 10 - Mini plenary. 4-mark exam question with answer that animates on to the screen. Slide 11 – Small additions to the nuclear model, e.g. Niels Bohr, James Chadwick and discovery of the proton. Slide 12 - Applied learning time (ALT). 6-mark exam question with answer. Slide 13 - Plenary. Quick fire questions with names of random students in the class. Alternatively, you can use the No hands app random name generator https://www.ehyde.com/No Hands/ My LinkedIn url: www.linkedin.com/in/erasmusdwemoh Follow me on Twitter https://twitter.com/MC_Afrique If you have a positive experience with the resource please leave a positive review!
Motor effect lesson with questions and answersQuick View
MC_AfriqueMC_Afrique

Motor effect lesson with questions and answers

(0)
Motor effect GCSE Physics lesson including Flemming’s left hand rule, magnetic flux density, Fleming’s left-hand rule, electromagnets, motor effect practical and DC motors with questions and answers throughout the lesson. The lesson objectives are as follows: Describe how a magnet and a current-carrying conductor exert a force on one another, Show that Fleming’s left-hand rule represents the relative orientations of the force, the current and the magnetic field and Apply the equation that links the force on a conductor to the magnetic flux density, the current and the length of conductor to calculate the forces involved. The slides are fully animated and include answers to every mini plenary question and exam question. The breakdown of the slides is as follows: Slide 1 - Title and 5-minute starter. The starter is a grid of four questions entitled ‘last week, last lesson, today’s learning and future learning’. Use this generic slide for all of your lessons by simply changing the questions and the answers each time. Slide 2 - Lesson objectives (see above) Slide 3 – Hinge question: What will happen when a wire with current flowing through it and the magnet are brought close to one another? Slide 4 – A demonstration of the motor effect using a cell, a piece of wire, a screw and a neodymium magnet. This can be done as a class practical if there is enough equipment. Slide 5 – Explanation of what the class observed in the demo/practical Slide 6 – Definition of motor effect presented to class: A wire carrying a current creates a magnetic field. This can interact with another magnetic field, causing a force that makes the wire move. Slide 7 - Mini plenary. Three questions of increasing difficulty. Answers animate onto the screen Slide 8 – Introduction to Fleming’s left-hand rule (LHR) Slide 9 – Fleming’s left-hand rule visual aid with useful acronym Slide 10 – Worked example of how to use Fleming’s LHR Slide 11 – Mini plenary. Students attempt to use Fleming’s LHR to work out the direction of movement. Answers animate onto the screen Slide 12 – Introduction to the calculation of forces involved in the motor effect Slide 13 - 𝐹=𝐵𝐼𝑙 equation, with symbols and units given Slide 14 – Worked example using the 𝐹=𝐵𝐼𝑙 equation Slide 15 – Mini plenary. Questions testing students’ knowledge of the 𝐹=𝐵𝐼𝑙 equation. Answers animate onto the screen Slide 16 – ALT (Applied Learning Time) Students work independently during this stage of the lesson, answering questions linked to the objectives of the lesson. Answers animate onto the screen at the click of a button. Slides 17-21 – Plenary. Short-answer exam questions with answers that animate on to the screen Use the No hands app random name generator to keep students engaged! [Link] (https://www.ehyde.com/No Hands/) My LinkedIn url: [Link] (www.linkedin.com/in/erasmusdwemoh) Follow me on Twitter: [Link] (https://twitter.com/MC_Afrique)
Menstruation rap 9-1 with questions and answersQuick View
MC_AfriqueMC_Afrique

Menstruation rap 9-1 with questions and answers

(0)
Menstrual cycle GCSE Biology questions and answers How to use Print the lyrics Print the questions Play the song and encourage pupils to rap along Pupils answer questions Self-assess with answers Lesson obs feedback = OUTSTANDING!