


This is a key stage 3 project where students do a polyprint on fabric using printing inks. This is a short 6 week project but could be developed to incorporate embellishments and sewing skills to fabric. I did this with year 8 and it took 6 weeks. Student enjoyed the outcome and it could have been made into a cushion for each student but we made a class fabric wall hanging. (There is a second Powerpoint in a Bundle which has all the pictures used for students to work from - A-Z of nature pictures)
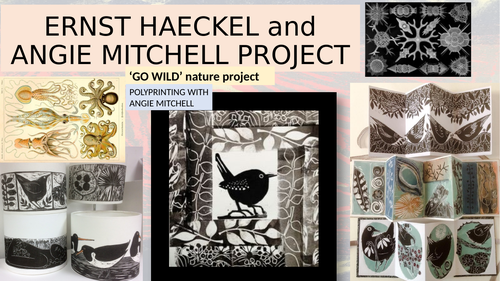
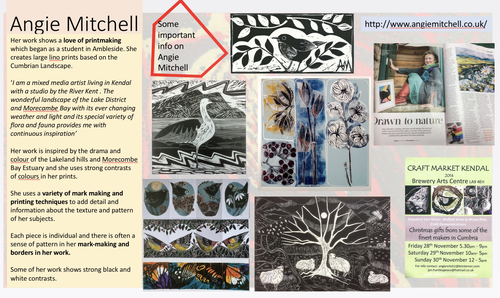
Artists used: Angie Mitchell and Ernst Haeckel
Resources required
Polyprint blocks
Printing ink
Rollers
Tables to roll out on
Fabric square per child
Paper for test prints
Research sheet for drawings and artist research.
Project schedule 6 weeks
- The resources for the students to work from. Each student chooses what they would like to draw.
- The steps to take while making the print and examples of student’s outcome.
Students begin by researching Angie Mitchell and Ernst Haeckel and make up a sheet with these two artists and their drawings. The drawings they do of one of the pictures of the slide pictures of animals and bits of nature from A-Z. Students choose which animal or fish or plant they would like to draw. Students spend time doing a detailed drawing and design a border pattern for this work in black and white.
Success criteria of drawings
To use fine lines and to capture quality detail
To concentrate on negative and positive shapes
To develop a border pattern from nature around the drawing
To try to layer up your drawing with foreground and background shapes
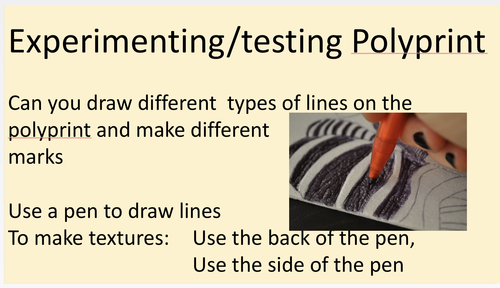
The students drawings are then photo-copied and transferred to the polyprint block. Students use the photocopy to press through onto polyboard. The students are given a square and a strip of polyprintboard . Students first of all experiment printing on paper with their design and border. Students can do a black and white print or do a polyprint print of two colours overlaying their inks.
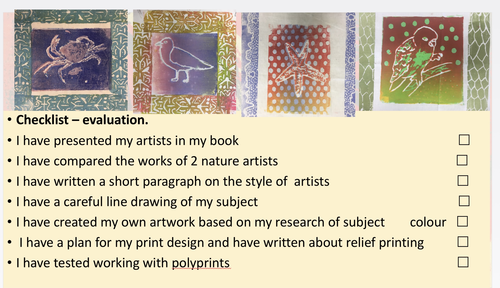
The slide presentation gives you also opportunities for reflection and evaluation of outcome at the end.
I have presented my artists in my book
I have compared the works of 2 nature artists
I have written a short paragraph on the style of artists
I have a careful line drawing of my subject
I have created my own artwork based on my research of subject colour
I have a plan for my print design and have written about relief printing
I have tested working with polyprints
Student outcome is a wall-hanging and we sewed all the students outcomes together to make a fabric collage of squares.
Get this resource as part of a bundle and save up to 34%
A bundle is a package of resources grouped together to teach a particular topic, or a series of lessons, in one place.
Bundle
GCSE artists - teaching skills through artist studies Developing ideas AO1
A support for teaching GCSE art A number of powerpoints on individual artists to use as part of Developing ideas for Assessment Objective One. Learning skills in Art Acrylic painting with card - Viera Da silva painting layers and using Gold - Victoria Crowe Photocopy drawing with Chila Burman Klimt patterns Transfer medium with Robert Rauschenberg Tim Burton drawings and fantasy art Printing with Angie Mitchell relief prints Figure drawing and simplification using Henry Moore City street painting with Lowry Peter Blake graphic CD cover Photography of Cindy Sherman All of these tasks will build skills for GCSE final project Starting in year 9 and year 10 begire students choose own topic to develop
£16.00
Bundle
Art Polyprint relief fabric Angie Mitchell/ Ernst Haeckel Nature project
There are two resourcs 1. powerpont with example of the print technique 2. Nature pictures A-Z
£2.10
Something went wrong, please try again later.
This resource hasn't been reviewed yet
To ensure quality for our reviews, only customers who have purchased this resource can review it
Report this resourceto let us know if it violates our terms and conditions.
Our customer service team will review your report and will be in touch.
£1.70