I create resources for mathematics teaching based on the Singapore and Shanghai curriculum models for best practice.
I will focus on the core principles of Intelligent Practice, Low-Threshold High-Ceiling tasks, fluency based activities and Problem Solving and Reasoning activities.
I create resources for mathematics teaching based on the Singapore and Shanghai curriculum models for best practice.
I will focus on the core principles of Intelligent Practice, Low-Threshold High-Ceiling tasks, fluency based activities and Problem Solving and Reasoning activities.
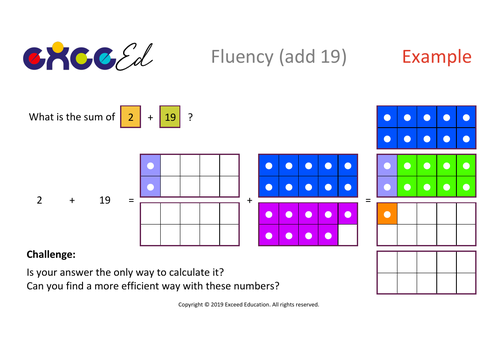
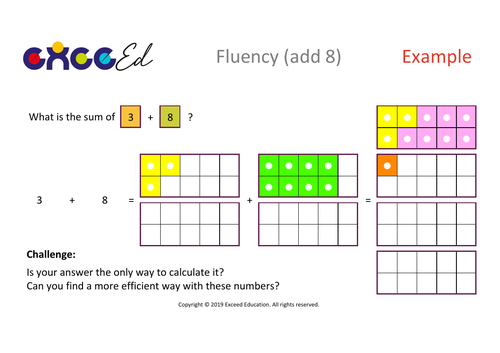
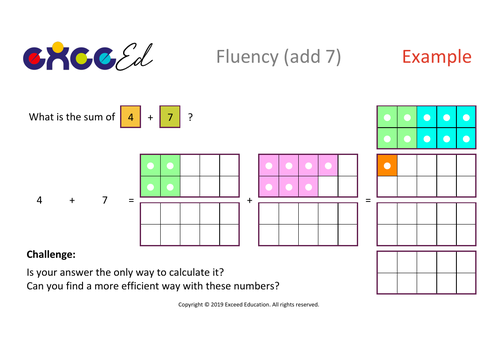
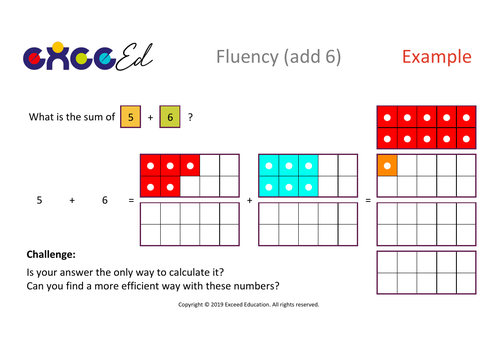
Do you operate a ‘mastery’ classroom? Do you find it difficult to teach bridging method using visual resources? Look no further than the full set of fluency activities designed to allow children to develop the skills of bridging as an addition strategy using Numicon or Tens Frames.
The full sets include blank spaces for children to record, an answer pack for demonstrating on the IWB, and an example question to start the teaching. Each set is divided into a specific addition focus (either adding 6, 7, 8, 9, 16, 17, 18, or 19).
This activity is ideal for children in Key Stage 1 or 2.
How could I use this activity?
Our staff have used these fluency packs in two main ways:
As a whole class teaching input, using the Example page to show strategy of partitioning the add focus visually, followed by whole class work through of the questions whilst on the Interactive Whiteboard.
Individual booklets (printing 4 pages per sheet in the print settings) and allowing children to work through the booklet with at their own pace, or with a teacher or TA).
How are the activities useful?
In terms of developing real mastery amongst your students, it is important that they can:
Answer simple addition problems quickly from memory, or by using calculation strategies rather than counting. This pack allows children to develop a long term memory of addition facts through the visual nature, whilst helping them to calculate through a bridging strategy.
Manipulate numbers in different ways so that they can be confident in any addition scenario. This pack enables children to consider the most efficient methods of bridging.
How do children develop more efficient methods?
Encourage your children to recognise the different ways to manipulate the calculation. As an example, consider 6 + 7:
Some children will automatically change this to 7 + 6 because they have been drilled into “put the largest number first”. For true mastery, children must be able to recognise that addition involves the sum of two addends, and therefore it doesn’t matter which one goes first. So, how do we teach this? Ask them to calculate (not count) the answer both ways around. What do they notice?
For 6 + 7, we partition 7 into 4 and 3, because 6 + 4 = 10, and this is what we call bridging.
For 7 + 6, we partition 6 into 3 and 3, because 7 + 3 = 10.
In both examples the sum is still 13, but the partitions we created we different.
So, which one is more efficient?
The honest answer is, once we are fluent, they are both efficient. But, whilst we are still learning, most children will find it easier to do 6 + (4 + 3) for the simple reason that even numbers bonds to 10 are easier to remember. Your biggest challenge as a teacher using a mastery style, is to get the children to recognise this of their own accord through real reasoning in the classroom. That’s why these resources have been designed to visually show each calculation.
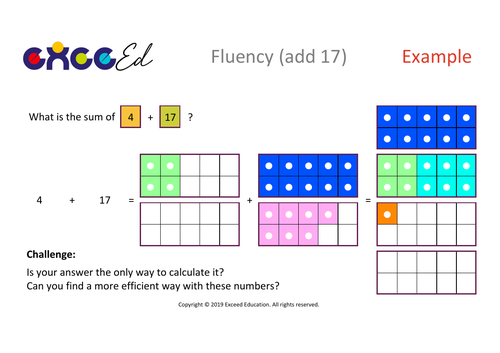
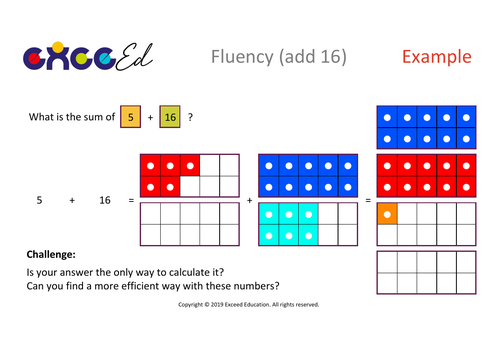
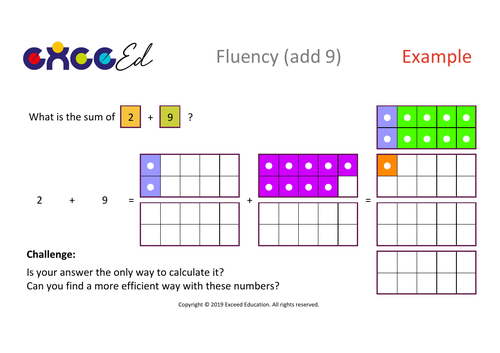
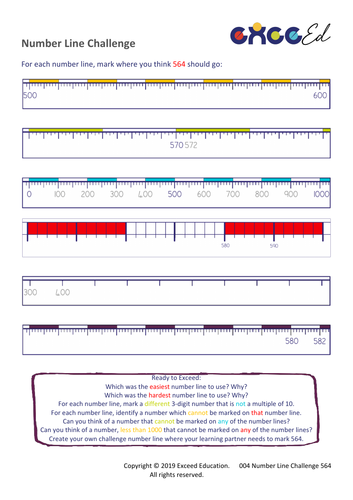
Do you operate a ‘mastery’ classroom? Do you want to know how well your students really understand place value, number lines and the intervals found on them? Look no further than this full-lesson reasoning-based activity, complete with answers. There is also a complete set of mastery style questions after the initial task, which is aimed specifically at stretch and challenge for all children.
This activity is ideal for children in Key Stage 2.
How could I use this activity?
As a pre-assessment and post-assessment of any unit you teach linked to number lines, intervals (marked and unmarked) and even measures;
As a full-lesson activity related to those same areas of learning.
Why is this activity useful?
This activity has been specifically designed to develop children’s reasoning skills. They are given some limited information for each number line, with the only constant being the number they have to mark. Each number line represents a different scale, with different values for the intervals. Children will need to use all of their logic to establish the other intervals, and therefore where 564 can be marked. We have used this activity in a classroom, and found the knowledge we gain as teachers about each child’s true maths ability and understanding, is far greater than any test could provide.
Which objectives in the UK National Curriculum does it match?
Key Stage 2
Number and Place Value:
recognise the place value of each digit in a three-digit number (hundreds, tens, ones)
compare and order numbers up to 1000
identify, represent and estimate numbers using different representations
solve number problems and practical problems that involve all of the above
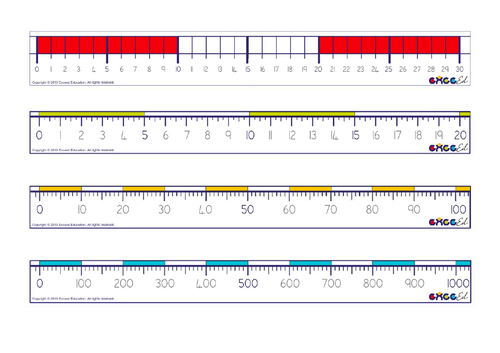
Do your children find counting and visualising numbers difficult? Do they need extra resources on hand to help them work independently? Look no further than this set of 5 number lines with different scales:
0 to 30 with colour-coded 10 blocks. (Y1 to Y4 version)
0 to 20 with colour-coded 5 blocks and marked quarters and halves.
-9 to 0 with intervals of 1. (Y3 to Y6 version)
0-100 with colour-coded 10 blocks.
0-1000 with colour-coded 100 blocks.
Number lines are essential tools for understanding place value, addition and subtraction strategies, informal written methods leading to more mental calculation skills, and also for understanding the intervals when using measuring devices with scales (e.g. rulers, protractors, tape measures etc).
For best results, print, trim and laminate the four number lines or individually for use as a maths bookmark. In all of my classes, I created one of these for each child. There were able to use them whenever needed, and by having all four on one sheet made them a lot more useful in everyday learning. In a mastery classroom, this is the perfect resource for supporting all children.
This is the full Intelligent Practice programme developed for fractions, and comes complete with answers on separate pages. You can try the Intelligent Practice: Fractions - Thirds free sample before you buy.
There are separate pages for each multiple of 3 (and corresponding 10x value) from 3 to 99, representing 33 pages of worksheets designed specifically for developing student confidence and deeper understanding.
The visual representations (BAR models) of the fractions aim to help children understand the concept of three ‘parts’ to a ‘whole’. Intelligent practice guides them through calculating one third, two third, and three thirds of the amount.
The second section enables children to repeat this process for an amount that is 10 times greater, helping to reinforce place value understanding, and its effect on the fraction parts.
The final section encourages children to reflect on the patterns they have noticed. Skilful questioning from the teacher will enable the children to identify, for example:
Why the whole amounts used are always multiples of 3;
Why the ‘parts’ in each section increase by the same amount each time;
Why the ‘parts’ between sections are also 10x greater;
Why every time the ‘whole’ increases by 3, each part increases by 1, etc.
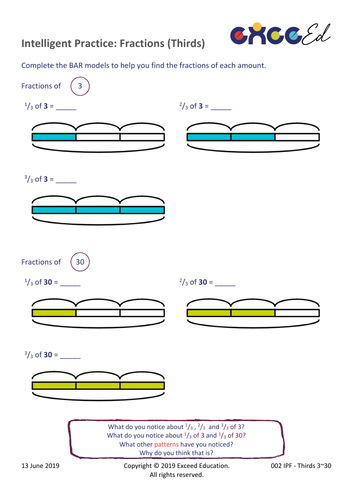
This is the free sample version of the full Intelligent Practice programme developed for fractions, and comes complete with answers on a separate page. You can buy the full version of the Intelligent Practice: Fractions - Thirds booklet, complete with 33 pages, plus answers.
The visual representations (BAR models) of the fractions aim to help children understand the concept of three ‘parts’ to a ‘whole’. Intelligent practice guides them through calculating one third, two thirds, and three thirds of the amount.
The second section enables children to repeat this process for an amount that is 10 times greater, helping to reinforce place value understanding, and its effect on the fraction parts.
The final section encourages children to reflect on the patterns they have noticed. Skilful questioning from the teacher will enable the children to identify, for example:
Why the whole amounts used are always multiples of 3;
Why the ‘parts’ in each section increase by the same amount each time;
Why the ‘parts’ between sections are also 10x greater;
Why every time the ‘whole’ increases by 3, each part increases by 1, etc.
This is the full Intelligent Practice programme developed for fractions, and comes complete with answers on separate pages. You can try the Intelligent Practice: Fractions - Quarters free sample before you buy.
There are separate pages for each multiple of 4 (and corresponding 10x value) from 4 to 100, representing 25 pages of worksheets designed specifically for developing student confidence and deeper understanding.
The visual representations (BAR models) of the fractions aim to help children understand the concept of four ‘parts’ to a ‘whole’. Intelligent practice guides them through calculating one quarter, two quarters, three quarters and four quarters of the amount.
The second section enables children to repeat this process for an amount that is 10 times greater, helping to reinforce place value understanding, and its effect on the fraction parts.
The final section encourages children to reflect on the patterns they have noticed. Skilful questioning from the teacher will enable the children to identify, for example:
Why the whole amounts used are always multiples of 4;
Why the ‘parts’ in each section increase by the same amount each time;
Why the ‘parts’ between sections are also 10x greater;
Why every time the ‘whole’ increases by 4, each part increases by 1, etc.
This is the free sample version of the full Intelligent Practice programme developed for fractions, and comes complete with answers on a separate page. You can buy the full version of the Intelligent Practice: Fractions - Quarters booklet, complete with 25 pages, plus answers.
The visual representations (BAR models) of the fractions aim to help children understand the concept of four ‘parts’ to a ‘whole’. Intelligent practice guides them through calculating one quarter, two quarters, three quarters and four quarters of the amount.
The second section enables children to repeat this process for an amount that is 10 times greater, helping to reinforce place value understanding, and its effect on the fraction parts.
The final section encourages children to reflect on the patterns they have noticed. Skilful questioning from the teacher will enable the children to identify, for example:
Why the whole amounts used are always multiples of 4;
Why the ‘parts’ in each section increase by the same amount each time;
Why the ‘parts’ between sections are also 10x greater;
Why every time the ‘whole’ increases by 4, each part increases by 1, etc.
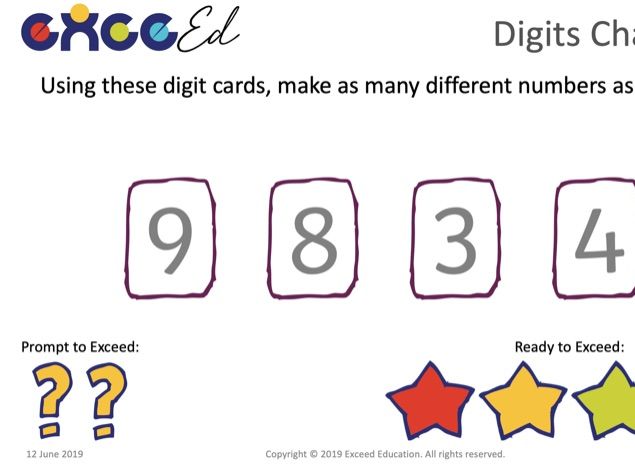
LESSON TYPE: Investigation and Low-Threshold High Ceiling
This is a full lesson PowerPoint for KS2 children. The lesson is a Low-Threshold High-Ceiling task as defined by nRich and the University of Cambridge.
Included are some simple instructions for moving through the PowerPoint, and a main task page. From this page, students or teachers can navigate to two question ‘prompts’ for if they are stuck, and four ‘ready to’ stars, for if they need further challenge.
The lesson is designed so that all children are able to access the content at their level, with multiple examples of self and teacher directed challenge evident throughout the activity.
This lesson has been delivered during an OfSted Inspection, and received ‘Outstanding’ feedback for its focus on mastery skills, child-led learning and stretch and challenge for all students.