


Recent
Most read

If you had to attend an Inset day with no clear agenda, how would you feel? Anxious? Confused? Stressed?
Last year, I was asked this question by teacher trainer Jen Foster during her CPD course on revolutionising behaviour.
She explained that these feelings can cause different responses: fidgeting (bodily reaction to stress), disengagement (if I look down, I won’t be asked), faux engagement (just keep nodding along) and talking (can someone tell me what’s going on?).
We know that these responses often do not result in effective teaching and learning. And yet, too often, our pupils enter the classroom with no idea what awaits them that day.
When many of my Year 4 pupils told me that feelings of nervousness and anxiety had intensified after lockdown, I decided to introduce a visual timetable to establish a clear routine and make it obvious what they could expect from that day.
I began by mapping out the structure of the day - the times of each lesson and what each lesson would be. I wrote this hour-by-hour on the whiteboard, with each event accompanied by a simple doodle.
This was visible to my class as they entered the classroom in the morning.
It worked well as it meant that things could easily be adjusted by erasing and rewriting, and I could get the children involved by asking them to write some parts of the timetable or erase lessons that had been completed.
After a few weeks, though, I noticed that some of my pupils, especially those with special educational needs or disabilities or English as a second language, were not as engaged with the timetable as others - and I wondered if it was because I was writing the timetable by hand, and it was constantly changing, in an ad-hoc way.
Perhaps, a more concrete solution was needed. After reflecting on this, I decided to adapt my timetable to include images alongside every lesson.
I found and adapted a free timetable template from Tes resources, but you could also use your own photos, free Google images or symbols from Widgit - whichever images you think your children will make the most connection with.
For example: pictures of fruit for snack time; a globe for geography; a computer for computing; and a ruler with the four operation symbols for maths.
To begin with, I stuck to the core lessons of the day but, as it evolved, I expanded the timetable, adding other routines like tidying up, snack time and quiet reading. Although these are much shorter sessions, they happen every day so I thought it was important to include them. The more specific I was about the day, the more settled I found my pupils to be.
When I first introduced the timetable, I went through it at the beginning of every morning, but as the year went on, the children became much more independent at checking the timetable and understanding it without me needing to explain each item.
Sometimes, we did still talk through it together, if there were lessons they were unsure of. If I’d ever forgotten to change it or something was missing, they were quick to notice and inform me.
There were times when children noticed a lesson on the timetable they didn’t enjoy - however, because they were made aware of it early in the day, it gave them time to prepare and see what was coming afterwards.
Overall, I’ve been really pleased to see how well the children respond to the visual timetable. As soon as they come through the door, it’s the first thing they check and discuss.
A visual timetable is such a simple tool, but it has given my pupils a sense of calm and routine. They tell me they no longer feel so anxious about what is to come as they know the daily structure is right there for them to refer to.
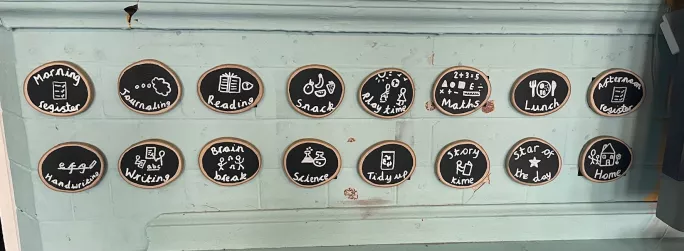
This September, I decided to create a natural-looking visual timetable to fit with our school environment. I purchased log slices, some chalkboard paint and some Velcro strips to complete this. The pupils will be able to pull each part off once complete, which, so far, has been a real success.
Although I’ve used this with Years 3 and 4, I think a visual timetable could be used across many different age groups. In early years and key stage 1, you would want to keep the language very simple, use a precise picture to help the children make clear links and, if possible, add sound buttons (which break up words into phonetic sounds) underneath each word to encourage children to read the words.
With older children, you could encourage them to get involved in building the timetable and ask them to draw the images or write the names of the lessons.
No matter what age you teach, I’d advise that you leave some blank sessions in case you have a random activity. Alternatively, you could also draw a simple picture on a post-it note and add it in.
Gemma Redpath is a Year 3 teacher and art lead in Manchester