The Enigma MachineQuick View
eli17eli17

The Enigma Machine

(12)
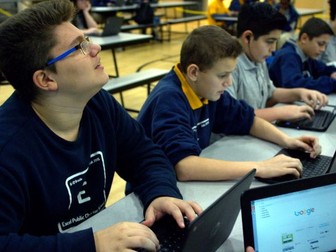
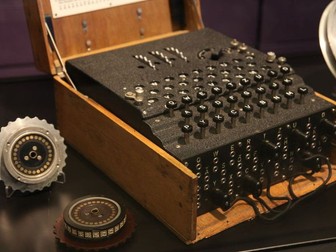
In the Enigma Machine lesson, students will learn the intricacies of cryptography used in World War II to convey secret messages to soldiers in the field. Students will start by looking at a simple shift cipher and will create their own cipher wheel to send and receive encoded messages. Students will then learn about the German Enigma Machine and will run a web-based emulated version to better understand how it works. Finally, students will discover how the Allies broke the Enigma’s code in WWII and the effect that had on winning the war. Part of this lesson was adapted from a lesson plan by Northern Illinois University. For Google Docs and Slides links, please visit https://www.ctlessons.org/social-studies/the-enigma-machine.html Topics addressed: Basic cryptography and relevant vocabulary Shift ciphers and how they encode plain text using a simple algorithm The Enigma Machine and its impact on the outcome of World War II Primary CT concept: algorithms. Students will consider different algorithms used in various forms of cryptography, including the very complicated logic involved in the Enigma Machine. Students will be able to: Explain why cryptography is necessary to keep messages secret Explain the algorithm of a simple shift cipher Understand at a high level how the Enigma Machine operates Understand at a high level how the Enigma Machine was defeated Materials: PowerPoint presentation Shift cipher template and instructions Suggested lesson breakdown: 10-15min – introduction to cryptography 10-15min – students create and test cipher wheels 5min – discussion on shift cipher 7min – Enigma Machine video 10min – Enigma Machine web emulator 10min – Cracking the Enigma Machine video
Modernizing Myths from Ancient GreeceQuick View
eli17eli17

Modernizing Myths from Ancient Greece

(4)
In the Modernizing Greek Myths lesson, students read and summarize a classic myth from Ancient Greece. Working in teams, they then brainstorm ways to bring that myth into the modern age. Teams write three minute plays based on their modern ideas, performing their work in front of the class to complete the project. The source myths for this activity were written by Lin Donn, and the King Midas radio play embedded in the PowerPoint presentation was created by the BBC. For Google Docs and Slides links, please visit https://www.ctlessons.org/social-studies/modernizing-myths.html Topics addressed: Cultural and religious significance of Ancient Greek myths Primary CT concept: abstraction. Students identify the central theme and/or moral from their myth and create an entirely new story that symbolizes the same tenet. Students will be able to: Identify the central theme and moral of a specific Greek myth Write and perform a modern adaptation of a Greek myth of their choosing Materials: PowerPoint presentation Student worksheet Original myths Lined paper for students to write their short plays Prep: Print enough copies of each original myth such that teams will have at least a few options to choose from Suggested lesson breakdown: 2min – activity introduction with PowerPoint presentation 15min – class listens to King Midas myth radio play (in PowerPoint presentation) 5min – finish introducing activity with PowerPoint presentation 15min – teams of three students read and summarize their selected Greek myth 30-60min – teams write their modern adaptations in play form 20-30min – teams present their plays to the class
The Scramble for AfricaQuick View
eli17eli17

The Scramble for Africa

(2)
The Scramble for Africa is a simulation of the colonization of Africa from 1500 through 1900. Students take on roles of major European countries and are given a dynamic set of objectives as they take turns claiming territory and resources across the map. This activity was adapted from a paper-based lesson by Andrew Patterson. Note: This activity is a gamified version of a tragic period of history. This should not be used with students unless you can devote sufficient time afterwards for a class-wide conversation that properly contextualizes the choices students made in the game and explores the true impacts of colonialism. You may also choose to provide some of this context up-front to best meet the needs of your students. For Google Docs links, please visit https://www.ctlessons.org/social-studies/the-scramble-for-africa.html Topics addressed: Colonization in Africa Geography, natural resources and climates of Africa Primary CT concept: pattern recognition. Students must plan where they want to claim territory over multiple turns in order to succeed, keeping track of where competing countries are moving that may block their paths. Students will be able to: Explain the objectives of their assigned country in the Scramble for Africa Understand how competition for land and resources led to the scattered layout of colonies in Africa Materials: Scramble for Africa web app: https://www.ctlessons.org/apps/scrambleForAfrica/scramble.html Student handout Prep: This activity assumes your students are familiar with the tragedy of colonization in Africa – the simulation itself does not adequately address the dire consequences and inherent racism associated with colonization. Decide which students will be representing each team. You can run the simulation with anywhere from one to seven teams – the more, the better! Create a new world code in the Scramble for Africa web app. You can share world- and team-specific links with your students, or simply provide the world code and assigned team to them to enter within the web app. Suggested lesson breakdown: 5-10min – students complete the first page of the handout, identifying their objectives throughout the game 50-100min – run through of the Scramble for Africa simulation. Each turn is time-limited, but the length of the game will depend on how many teams are playing. 5-10min – students complete the second page of the handout, asking them to evaluate their performance within the simulation
Designing Greek Monuments in 3DQuick View
eli17eli17

Designing Greek Monuments in 3D

(5)
In the Designing Greek Monuments in 3D lesson, students design new monuments to honor events in Greek history, Greek gods, or another aspect of Ancient Greece. After sketching their design on paper, students create their designs in 3D using the web-based modeling tool TinkerCad. Finally, students explain their creations in a short essay to accompany their designs. For Google Docs and Slides links, please visit https://www.ctlessons.org/social-studies/designing-greek-monuments.html Topics addressed: Architectural style of monuments in Ancient Greece Historical and cultural significance of Greek monuments Primary CT concept: abstraction. Students distill information about a Greek god or an event in Greek history into a relatively simple 3D design that symbolizes their chosen topic. Students will be able to: Design an architectural structure to represent a Greek god or event in Greek history Create a monument in 3D using TinkerCad Explain how their monument symbolizes their chosen topic Materials: PowerPoint presentation Student worksheet TinkerCad Prep: Create a Google Doc assignment in Google Classroom where students can write their short essay and share the link to their monument in TinkerCad Familiarize yourself with TinkerCad for thirty minutes or so, to better support students who have questions while learning how to create models in 3D Suggested lesson breakdown: This activity can be run in one longer period, or split over two shorter periods. 10min – activity introduction with PowerPoint presentation 15min – students (individually) select a topic for their monument and draw their 2D sketch on the worksheet 5min – walk students through logging into TinkerCad 10min – students (individually) work through TinkerCad introductory lessons 40min – students create their monuments using TinkerCad 10min – students write a short two-paragraph essay explaining how their design relates to their selected topic
Body System Amusement ParksQuick View
eli17eli17

Body System Amusement Parks

(3)
In the Body System Amusement Parks project, students team up to create amusement parks based on the various systems and organs within the human body. With the power of abstraction, each attraction represents the cardiovascular system, the muscular system, the digestive system, etc. Teams create both 3D scale models and presentations to an unnamed wealthy investment firm looking to build a new park in the students’ very own town. This activity was heavily inspired by a post from Danielle Dace. For Google Docs and Slides links, please visit https://www.ctlessons.org/science/body-system-amusement-parks.html Topics addressed: Body systems – cardiovascular, muscular, digestive, skeletal, nervous, respiratory Primary CT concept: abstraction. After spending some time learning about the nitty-gritty details of the heart, the lungs, the stomach, etc, this is a great opportunity for students to take a step back and think about these body systems at a higher level, representing their key concepts with simple craft materials. Students will be able to: Understand the key components and functions of body systems Describe how various body systems relate to and work with one another Explain their design and scientific reasoning in a professional presentation Materials: Cardboard Craft supplies, such as pipe cleaners, felt, ribbon, string, aluminum foil, cotton balls, popsicle sticks, construction paper, pom poms, tape, washable glue, hot glue guns… Prep: Ensure you have enough cardboard bases for each team – cutting up large boxes works great! Come up with an organization system for your supplies, or make kits for each team Create teams, and (recommended) select one student on each team to be the sole material retriever Consider personalizing the PowerPoint presentation and student handout – create a fake investment firm with school staff, add your town name, etc. Suggested lesson breakdown: This project easily scales to however much time you have available. It works great towards the end of the unit, either just before or just after your unit exam. You’ll want to devote the bulk of at least two class periods to students creating their models, and another period for creating their presentations. 10min – introduce project, go over requirements and grading rubric 5-10min – full-class brainstorm and discussion on what you typically find in an amusement park 5min – students independently brainstorm attractions based on body systems 15min – students break into their teams and come up with a plan before you allow access to the materials 60-120min – teams work on their 3D models 45-60min – teams work on their presentations 20-30min – teams present their work to the class For further information and relevant standards, please visit https://www.ctlessons.org/science/body-system-amusement-parks.html
Creating a PodcastQuick View
eli17eli17

Creating a Podcast

(3)
In the Creating a Podcast project, students team up to write and record elements of a podcast about a novel they are reading. Students choose components from a list of ideas, each of which are worth a certain number of points towards the effort portion of the project grade. After brainstorming and scripting each segment, students act out and record their podcast using Soundtrap. The materials for this project are based on Harper Lee’s “To Kill a Mockingbird”, but this project would work well with most novels. For Google Docs and Slides links, please visit https://www.ctlessons.org/ela/creating-a-podcast.html Topics addressed: Central themes in novels Symbolism and imagery in novels Characters and relationships in novels Primary CT concept: decomposition. Students break down a complicated novel into distinct elements, relating them to one another in discrete and creative podcast segments. Students will be able to: Create a podcast based on elements on a novel they are reading Identify themes and symbols within a novel Write and act out interviews and conversations with characters from a novel Materials: PowerPoint presentation Student packet Prep: Familiarize yourself with Soundtrap and create an account before students begin recording Students should be finished or nearly finished with the novel they will be writing about before finishing their podcasts Suggested lesson breakdown: This project can be done in a few days or spread over a couple of weeks Day one 10min – introduce project using PowerPoint presentation 10-30min – place students into their teams, allow them to start brainstorming podcast segment ideas Day two 30-90min – students collaborate within their teams to write and rehearse each podcast segment Day three 30-60min – teams record their podcast segments Day four 30-60min – teams edit their podcasts For further information and relevant standards, please visit https://www.ctlessons.org/ela/creating-a-podcast.html
Cell AnalogiesQuick View
eli17eli17

Cell Analogies

(2)
In the Cell Analogies project, students represent plant or animal cells by coming up with an overarching analogy that includes each cell component. They create a visual representation of their analogy on paper, in Google Slides or by coding it in Scratch, and then explain how each organelle fits in with their chosen analogy in a written justification. For Google Docs and Slides links, please visit https://www.ctlessons.org/science/cell-analogies.html Topics addressed: Plant cells, animal cells and organelles Primary CT concept: abstraction. After spending some time learning about the nitty-gritty details of cells and organelles, this is a great opportunity for students to take a step back and think about the cell at a higher level, representing key concepts and functions with creative analogies. Students will be able to: Describe how each organelle functions and how it benefits the cell Create a visual representation their cell analogies in an artistic format Materials: PowerPoint presentation Student handout Craft materials, if you’d like students to have the option of creating a 3D model Suggested lesson breakdown: This project is more of a practice/synthesis tool than a teaching tool, and therefore works best towards the end of the unit. 10min – introduce project, go over requirements and grading rubric 10-15min – students brainstorm their overarching analogy and how each organelle fits in 55-70min – students create their visual representations of their analogies 15-25min – students write their explanations of each component of their analogy Next Generation science standards: NGSS.MS-LS1-2 Develop and use a model to describe the function of a cell as a whole and ways the parts of cells contribute to the function. Common Core standards: CCSS.ELA-Literacy.RST.6-8.7 Integrate quantitative or technical information expressed in words in a text with a version of that information expressed visually (e.g., in a flowchart, diagram, model, graph, or table).
Superhero TransformationsQuick View
eli17eli17

Superhero Transformations

(1)
In the Superhero Transformations project, students design their own simple superhero and distill it down to its core geometric shape. Students choose a story stem and write a short story about their superhero. Students then draw their hero’s shape into the first panel of a four-panel graph paper comic strip template, and use geometric transformations (translations, rotations and reflections) to make their character appear in the remaining three panels. Finally, students fill in the remaining visual elements needed in each panel (villains, backgrounds, props, etc). This project was adapted from a lesson by Karen Stafford. For Google Docs and Slides links, please visit https://www.ctlessons.org/math/superhero-transformations.html Topics addressed: Geometric transformations: translations, reflections and rotations Primary CT concept: algorithmic thinking. Students have to come up with the correct sequence of transformations to properly position their superheroes within each panel. Students also leverage abstraction when they simplify the shape of their hero, and decomposition when they break their story down into a fixed number of comic panels. Students will be able to: Use translations, reflections and rotations to move a geometric shape around the coordinate plane Create a visual story about a superhero of their own design Materials: PowerPoint presentation Student handout Comic template (print on 11x17" paper) Scissors Suggested lesson breakdown: This activity is more of a practice/synthesis tool than a teaching tool, and therefore works best towards the end of the unit. You can decide whether to keep students together when working through each step, or whether they can self-pace through the project. 10min - introduce project, go over requirements and grading rubric 5-10min - students create and draw their own superhero 5-10min - students create a simplified geometry version of their superhero 10-15min - students write a short story for their superhero using one of three story stems 10-15min - students break down their story visually into four comic panels 40-60min - students place their hero in the first panel and use geometric transformations to move him or her into each subsequent panel, recording the coordinates of each vertex within each panel 15-30min - students finalize their comic strip by adding backgrounds, characters, props, etc. For more information on standards alignment, please visit https://www.ctlessons.org/math/superhero-transformations.html
Lord of the Flies Island MapQuick View
eli17eli17

Lord of the Flies Island Map

(0)
In the Lord of the Flies Island Map activity, students team up to create an annotated map of the island from Lord of Flies, including important locations and events that help portray the novel’s story visually. Students also include a quote from the novel that relates to one of the central themes. Students are given significant flexibility on what they choose to include, but are evaluated based on the relevance and importance of each element. For Google Docs and Slides links, please visit https://www.ctlessons.org/ela/lord-of-the-flies-island-map.html Topics addressed: Lord of the Flies: central themes, events, locations Primary CT concept: abstraction. Students are asked to represent the most important aspects of the novel in a visual manner, deciding which details are critical and which can be left out. Students will be able to: Create a map that represents the most important events and locations in Lord of the Flies Identify a quote from the novel that represents a central theme of the text Materials: PowerPoint presentation Student handout 11x17" paper Colored pencils / markers Suggested lesson breakdown: This project assumes that your students have finished reading Lord of the Flies. 5min - introduce project, go over requirements and grading rubric 10-15min - students identify important events and locations from the novel, and a quote representing a central theme 60-80min - students create their maps For more information on standards alignment, please visit https://www.ctlessons.org/ela/lord-of-the-flies-island-map.html
Cell Division ComicsQuick View
eli17eli17

Cell Division Comics

(0)
In the Cell Division Comics activity, students create short comic strips that tell the story of cell division in a creative manner. Similar to the cell analogies project, students use abstraction to develop an analogy that still represents the scientific details they need to know about cellular division. Students brainstorm, create a quick sketch and then draw their final comic to share with their peers. For Google Docs and Slides links, please visit https://www.ctlessons.org/science/cell-division-comics.html Topics addressed: Cell division, mitosis, meiosis Primary CT concept: abstraction. After spending some time learning about the nitty-gritty details of cell division, this is a great opportunity for students to take a step back and think about the process at a higher level, representing each step in the process with a creative analogy. Students will be able to: Describe each step involved in cell division Create a visual representation the complete cell division process Materials: PowerPoint presentation Student handout Comic panel templates Colored pencils / markers Suggested lesson breakdown: This activity is more of a practice/synthesis tool than a teaching tool, and therefore works best towards the end of the unit. 5min - introduce project, go over requirements and grading rubric 10-15min - students brainstorm their idea and sketch a draft version of their comic strip 15-30min - students create the final version of their comic strip 5min - students share their comics with one another For more information on standards alignment, please visit https://www.ctlessons.org/science/cell-division-comics.html
Basketball Motion Analysis using DecompositionQuick View
eli17eli17

Basketball Motion Analysis using Decomposition

(1)
In the Basketball Motion Analysis lesson, students use decomposition to break down a specific LeBron James play from the 2015 NBA Finals. Students practice drawing and interpreting speed graphs, as well as discuss whether computers and data can replace human basketball coaches. This lesson was inspired by a post by Savvas Tjortjoglou. For Google Docs and Slides links, please visit https://www.ctlessons.org/math/basketball-motion-analysis.html Topics addressed: Speed / motion graphs Basketball strategy Primary CT concept: decomposition. Students begin by watching television footage of the play, which is full of sounds, camera flashes, changing angles, hundreds of people, etc. We use decomposition to break down the play into something more manageable, removing most of the players and all of the other distractors to focus solely on the ball and the four most relevant players. Students will be able to: Define decomposition and give examples of breaking down difficult problems into smaller pieces Discuss how the NBA collects motion tracking data on players during games, and what that data is used for Interpret the general shape of speed graphs as they relate to someone moving in one dimension Create a speed graph to represent their observation of someone walking at varying speeds Debate the balance of computers and algorithms vs direct human observation and traditional coaching in basketball analysis Read specific values from a speed graph, including speed at specific times, maximum speeds and determining when a given speed is reached Prep: Read about how the NBA tracks its players during games on Wikipedia at https://en.wikipedia.org/wiki/Player_tracking_(National_Basketball_Association) Suggested lesson breakdown: 5-10min – introduction to decomposition, examples outside of this lesson 15-20min – overview of how NBA tracks players and discussion of what that data can be used for 10min – introduction to speed graphs, full-class practice 10min – analysis of the play we’re analyzing 5-10min – interpreting speed graphs and discussing the answers to our questions 20min – individual practice on worksheet For further information and relevant standards, please visit https://www.ctlessons.org/math/basketball-motion-analysis.html
Polygon TransformationsQuick View
eli17eli17

Polygon Transformations

(1)
In the Polygon Transformations lesson, students explore geometric manipulations including reflections, translations, rotations and dilations using the Polygon Transformer web app. This tool can be used throughout the unit, and can also be leveraged to create homework and classwork assignments. For Google Docs links, please visit https://www.ctlessons.org/math/polygon-transformations.html This lesson is centered around my Polygon Transformer web app: https://www.ctlessons.org/apps/polygonTransformer.html This can also be leveraged as a Chrome app on Chromebooks: https://chrome.google.com/webstore/detail/polygon-transformer/fkhklciamngolbabcomakoljkfneeabp Topics addressed: Plotting polygons on the coordinate plane Transforming polygons through translations, rotations, reflections and dilations Recognizing and justifying geometric congruence Primary CT concept: algorithmic thinking. Students create an algorithm, which in this case is series of transformations, to change their starting polygon (the input) to their final polygon (the output). They can also work to identify the series of steps used when given both the input and the output, another essential skill for algorithmic thinking. Students will be able to: Describe how translations, rotations, reflections and dilations affect polygons on the coordinate plane Identify congruency in polygons after single or multiple translations, rotations and reflections Leverage a visualization tool to help solve geometric problems Prep: Install Polygon Transformer Chrome app on students’ Chromebooks (through Google Admin console), provide a link where they can install the Chrome app from, or provide a link to the web app. If you are not using Chromebooks, you must use the web app. It is possible to run this activity without the app, if you do not have devices for students. Suggested lesson breakdown: The Polygon Transformer app can be integrated into many lessons you likely already have – have students check their work on paper using the app, or allow them to use the app on some questions, or for homework. A possible worksheet is provided above, but it will heavily depend on how far into the geometric transformations unit your students are. 5min – introduce and demo Polygon Transformer app so students know what to expect and how to use it 30min – students use Polygon Transformer app to work through worksheet individually or with a partner 10-30min – students have “free time” to further explore the app, creating new shapes and exploring what different series of transformations lead to For further information and relevant standards, please visit https://www.ctlessons.org/math/polygon-transformations.html
Ancient Civilizations – ComputerQuick View
eli17eli17

Ancient Civilizations – Computer

(1)
In the computer-based Ancient Civilizations activity, students create their own civilization and see how it fares over the years based on choices they make for location, animals, plants and materials. Students trade resources between their civilizations, repeatedly go to war with unnamed enemies, and learn some fun facts about real-world ancient civilizations along the way. This activity was inspired by Guns, Germs and Steel by Jared Diamond. For Google Docs and Slides links, please visit https://www.ctlessons.org/social-studies/ancient-civilizations.html This lesson is centered around my Polygon Transformer web app: https://www.ctlessons.org/apps/ancientCivilizations/ancientCiv.html Topics addressed: Value of natural resources in ancient civilizations Impact of ecological and pathological events on populations Primary CT concept: abstraction. It would be foolish to try and explain all of ancient history by looking at just the natural resources available to a civilization, but for the purposes of this lesson, we abstract away all other details to focus on this important aspect of burgeoning civilizations. Students will be able to: Describe the impact of the Bubonic Plague and understand how some civilizations developed immunities, giving them significant advantage over other civilizations Understand that some animals, plants and materials are more valuable to a burgeoning civilization than others Understand how certain resources can be beneficial during periods of war Prep: Create a classroom code using the web app linked above. This will allow your students to trade with one another. If you’re focused on a particular ancient civilization, you could consider limiting the resources student can pick from to those that were plausibly in that civilization. In this way, you could repeat this activity in subsequent units with different civilizations. Suggested lesson breakdown: This activity is incredibly flexible. Students can play for a few minutes a day over several weeks, or they can play a full game within a sixty minute class period. For further information and relevant standards, please visit https://www.ctlessons.org/social-studies/ancient-civilizations.html
Making Babies with Punnett SquaresQuick View
eli17eli17

Making Babies with Punnett Squares

(0)
In the BabyMaker activity, students begin by identifying their own genetic traits, answering a series of questions about their facial features. As they input their phenotype, an animated cartoon representation of themselves as a baby is created. Students then randomly generate a second baby to “cross” with, and proceed to create new generations of babies by filling in Punnett Squares and by reading probabilities of expressed traits from Punnett Squares that are filled in for them. If they make a mistake, their babies might be missing a body part! This activity was heavily inspired by a paper-based activity from Cheryl Massengale. For Google Docs links, please visit https://www.ctlessons.org/science/making-babies.html This lesson is centered around my BabyMaker web app: https://www.ctlessons.org/apps/babymaker.html Topics addressed: Genetics – Punnett Squares, phenotypes, genotypes, traits, genomes Primary CT concept: algorithmic thinking. To fill out a Punnett Square is to be the “computer” performing the correct algorithm, taking the input (the alleles of each baby) and creating the output (the probability matrix for the new baby’s trait). Students will be able to: Complete Punnett Squares given two sets of traits Predict the likelihood of a trait being expressed given its Punnett Square Prep: This activity assumes your students have already been taught how to fill out and read Punnett Squares – it is a practice tool, not a teach-for-the-first-time tool. Suggested lesson breakdown: 5min – walk through the activity end-to-end in front of your class, showing how they select their own traits and how they both fill out and read the Punnett Squares using the handout 25-40min – students work independently in BabyMaker. If students don’t finish all five generations of their baby before the end of class, they can easily submit their high score at any point, no matter how far they got. Encourage accuracy over speed! For further information and relevant standards, please visit https://www.ctlessons.org/science/making-babies.html
Ancient Civilizations – PaperQuick View
eli17eli17

Ancient Civilizations – Paper

(0)
In the Ancient Civilizations activity, students create their own civilization and see how it fares over the years based on choices they make for location, animals, plants and natural resources. Students create an artistic rendering of their civilization, trade resources between their civilizations and go to war with an unnamed enemy. This activity was inspired by Guns, Germs and Steel by Jared Diamond. For Google Docs and Slides links, please visit https://www.ctlessons.org/social-studies/ancient-civilizations-paper.html Topics addressed: Value of natural resources in ancient civilizations Impact of ecological and pathological events on populations Primary CT concept: abstraction. It would be foolish to try and explain all of ancient history by looking at just the natural resources available to a civilization, but for the purposes of this lesson, we abstract away all other details to focus on this important aspect of burgeoning civilizations. Students will be able to: Describe the impact of the Bubonic Plague and understand how some civilizations developed immunities, giving them significant advantage over other civilizations Understand that some animals, plants and natural resources are more valuable to a burgeoning civilization than others Understand how certain resources can be used in tandem during periods of war Prep: Cut out game cards, place in hat/bag/bowl where they can be randomly drawn from during each turn of the game Suggested lesson breakdown: Day one 10min – introduce game, kickoff map activity 30min – students individually select their resources and draw their civilization maps Day two 5min – students prepare their game board 5min – students calculate food bonuses 5min – the plague hits… revel in the devastation 5min – random events Days three through six (these can be spread out over several weeks) 5min – students calculate food bonuses 5min – trade or war events 5-10min – random events For further information and relevant standards, please visit https://www.ctlessons.org/social-studies/ancient-civilizations-paper.html
Mapping Earthquakes to Save the WorldQuick View
eli17eli17

Mapping Earthquakes to Save the World

(0)
In the Mapping Earthquakes to Save the World activity, students leverage real-time data to plot earthquakes on a world map. The fate of the world is in their hands – the President of the United States has asked for their help to save humankind. Students identify patterns in their data and connect earthquakes with tectonic plates, making recommendations back to the President about where people are safe and where people are most at risk. This activity was heavily inspired by a project from the Stevens Institute for Technology Center for Innovation in Engineering and Science Education. For Google Docs and Slides links, please visit https://www.ctlessons.org/science/mapping-earthquakes.html Topics addressed: Plate tectonics and earthquakes GPS coordinates Primary CT concept: pattern recognition. Students are finding real-world, raw data and visualizing it geographically, then looking for trends and patterns in that data to draw conclusions about where and why earthquakes are happening and are likely to happen again. Students will be able to: Develop a hypothesis about what causes earthquakes and collect data to evaluate their hypothesis Plot points on a world map using GPS coordinates Recognize geographic patterns on a map and relate them to tectonic plate boundaries Compose a persuasive letter explaining their findings using scientific reasoning and citing data Prep: Sync with your students’ math teacher(s) to understand your students’ experience to date with the Cartesian coordinate plane, so you can appropriately frame GPS coordinates for them Print the tectonic plate overlay on vellum paper or transparency film that is designed for your printer (laser or inkjet). In a pinch, printing it on relatively low-weight normal white paper will work as well – students will just have to hold their papers up to the light to see through. Suggested lesson breakdown: This lesson can be run within a single class period, or can easily be split over two days. 10min – introduction of the project 5min – students form hypotheses 10min – how to plot with GPS coordinates 15-20min – students plot earthquakes from live GPS data 5-10min – students plot earthquakes from live map data 5min – students compare their maps with tectonic plate overlays 10min – full class discussion on findings 30-45min – students write letters on their findings to the President For further information and relevant standards, please visit https://www.ctlessons.org/science/mapping-earthquakes.html
Designing a Solar SystemQuick View
eli17eli17

Designing a Solar System

(0)
Designing a Solar System is an activity that allows students to explore the dynamics of a fully-customizable set of celestial bodies. Starting with just a star and a planet in stable orbit, students can add planets, asteroids and meteors at varying distances and watch to see how each body’s orbit is affected. Students can freely play with this simulation, or can follow along with a worksheet to create specific solar system configurations. For Google Docs links, please visit https://www.ctlessons.org/science/designing-a-solar-system.html Topics addressed: Gravitation The interaction between stars, planets, asteroids and meteors in orbit Primary CT concept: pattern recognition. Students experiment with different combinations of planets, asteroids and stars in an attempt to find stable orbits for each. Students will be able to: Explain how adding various celestial bodies affects the orbit of specific planets Understand how solar systems are determined by interactions between all celestial bodies, not just the star and each planet Materials: Solar Systems web app: https://www.ctlessons.org/apps/solarSystems/solarSystems.html Student handout Suggested lesson breakdown: This lesson is incredibly flexible – with the provided worksheet, students can work through it and have some free time to explore other scenarios in about an hour, but you should feel empowered to create challenges on your own as well that align with the learning objectives you’re targeting. You could also structure this lesson as a competition – ie, who can create a stable system with the most planets?
Drawing with CoordinatesQuick View
eli17eli17

Drawing with Coordinates

(0)
In the Drawing with Coordinates activity, students will create their own designs by plotting coordinate pairs on paper. They trade their list of coordinate pairs with a partner, who attempts to recreate the original image to see how accurate their algorithm was. Students then enter the same list of ordered pairs into the Coordinate Drawer web app and explore how changing points and reflections affect their designs. For Google Docs links, please visit https://www.ctlessons.org/math/drawing-with-coordinates.html This lesson is centered around my Coordinate Drawer web app: https://www.ctlessons.org/apps/coordinateDrawer.html This can also be leveraged as a Chrome app on Chromebooks: https://chrome.google.com/webstore/detail/coordinate-drawer/edemlnoljaljcajkpjhgmbaldhkfifgo Topics addressed: Identifying coordinates of a point Graphing coordinate pairs on the coordinate plane Primary CT concept: algorithmic thinking. Students are effectively writing a simple algorithm with their series of ordered pairs, and they will begin to understand that the computer running their algorithm (whether it’s their partner or the web app) only understands the exact algorithm they’ve input. Students will be able to: Create artistic designs by plotting and manipulating coordinate pairs Understand that computers perform the exact series of steps we input, even if we meant something different Prep: Install Coordinate Drawer Chrome app on students’ Chromebooks (through Google Admin console), provide a link where they can install the Chrome app from, or provide a link to the web app. If you are not using Chromebooks, you must use the web app. It is possible to run this activity without the app, if you do not have devices for students. Print the worksheet single-sided, such that students can share the second page independent of the first Suggested lesson breakdown: Students can self-pace through this lesson, but you might suggest or loosely enforce the following chunks: 5min – introduce the activity 5-10min – Step 1: students brainstorm and create a shape using only straight lines 5min – Step 2: students plot and connect coordinate pairs to recreate their design 10-20min – Step 3: students identify and list all of the coordinate pairs needed to recreate their design, keeping in mind that the order each pair is connected in is critical to the algorithm 10-20min – Step 4: students swap second pages with a partner, and each attempts to follow the other’s algorithm by plotting the coordinate pairs and connecting them in order. If students are self-pacing, have two students swap as soon as they are ready to move on. 20-30min – students use the Coordinate Drawer app to recreate and manipulate their designs and/or to create new designs For further information and relevant standards, please visit https://www.ctlessons.org/math/drawing-with-coordinates.html
Writing Historical FictionQuick View
eli17eli17

Writing Historical Fiction

(0)
In the Writing Historical Fiction project, students interview an adult family member or neighbor about their experience with a significant historical tragedy as a child or young adult. Students research the event and combine facts with their interview responses to craft a historical fiction narrative told from the perspective of their interview subject. This project closely aligns with Christopher Paul Curtis’ “The Watsons Go to Birmingham”, but can be adapted to fit other historical fiction novels as well. For Google Docs and Slides links, please visit https://www.ctlessons.org/ela/writing-historical-fiction.html Topics addressed: Writing historical fiction Interviewing someone about a moment in their life Researching a historic event Soliciting and integrating feedback Primary CT concept: abstraction. Students learn a lot of the factual details about the tragedy they’re writing about, but their goal is to portray the event through the eyes of their interview subject, forcing them to abstract away many of the finer details and focus instead on emotion and reaction. Students will be able to: Write a historical fiction narrative based on an interview and research Write and ask interview questions to establish details for their story Research a historic event to find key details that fit into their story Collect meaningful feedback and integrate it into their story Materials: PowerPoint presentation Student work packet Letter to interview subject: Prep: The materials provided for this lesson assume your students are currently reading “The Watsons Go To Birmingham”. If this is not the case, these materials will need to be tweaked. Suggested lesson breakdown: This project can be spaced out over a few days or over a few weeks. Day one 15min – introduce project using PowerPoint presentation, assign interview as homework Day two 30min – students research the event their interview subject selected. history.com is a wonderful resource for many of the events suggested in the work packet. Day three 30-60min – students write the first draft of their narrative. Assign collecting feedback from their interview subject as homework. Day four 30-90min – students incorporate the feedback they received into a final draft. Students can share their stories with the class as time allows. For further information and relevant standards, please visit https://www.ctlessons.org/ela/writing-historical-fiction.html
The Evolution of Zoe the ProtozoaQuick View
eli17eli17

The Evolution of Zoe the Protozoa

(1)
In The Evolution of Zoe the Protozoa, students take on the role of Zoe in the struggle to find food and adapt in an ever-changing changing environment. Starting as a lowly protozoa, Zoe and her species experience mutations, some of which are beneficial and some of which are quickly phased out over tens of thousands of years. Eventually, the simulation jumps forward in time and replaces Zoe with Berta, a simple bird facing similar challenges in her environment. For Google Docs links, please visit https://www.ctlessons.org/science/the-evolution-of-zoe.html Topics addressed: Adaptations, mutations and evolution Changing environments and interactions with other species Primary CT concept: abstraction. The simulation greatly simplifies many of the more complicated concepts associated with natural selection and adaptations so students can focus on simple mutations and their effects on finding food and surviving. Students will be able to: Play a natural selection simulation as both a protozoa and a bird Identify which mutations are the most beneficial for each species and why Materials: Evolution of Zoe web app: https://www.ctlessons.org/apps/evolution/evolution.html Student worksheet Prep: This lesson assumes students have already been introduced to the concepts of mutations, adaptations and natural selection Suggested lesson breakdown: This activity is fairly self-guided. Introduce the game to students, and give them roughly 45min to play through the simulation while answering questions on their worksheet. For further information and relevant standards, please visit https://www.ctlessons.org/science/the-evolution-of-zoe.html
Hanging Atom ModelsQuick View
eli17eli17

Hanging Atom Models

(0)
In the Hanging Atom Models project, students team up to create a series of elements using an online simulation tool. They record their results on paper and consider how their atoms differ from one another. Finally, teams choose one of their elements to create as a large wire model and then analyze the benefits and limitations of such a model. For Google Docs and Slides links, please visit https://www.ctlessons.org/science/hanging-atom-models.html Topics addressed: Atom models, components and ideas: neutrons, protons, electrons, ions, atomic number, atomic mass Primary CT concept: abstraction. Students create three types of models for a specific element, then evaluate how models are beneficial in our understanding of atoms, as well as how their models are limited. Students will be able to: Determine the number of protons, electrons and neutrons for specific elements Create visual models of atoms for specific elements Materials: PowerPoint presentation Student handout String Hobby wire – a reasonably sturdy picture hanging wire works great Small foam beads Glue Foil tape Prep: Create a hanging model for hydrogen that serves as an exemplar project, so students can better understand what their models should look like Consider creating the nuclei before class – thread a length of string onto a small needle and through a small foam bead, onto which all other protons and neutrons will be glued by students Suggested lesson breakdown: You can keep the class together for some or all of these steps, or allow teams to self-pace 10min – introduce project, go over requirements and and expectations and demo simulation tool 40min – students use the web-based simulation to create their selected five elements and answer the questions on the second page of their packet 30min – students create their physical hanging atom models 10min – students clean up and answer the reflection questions at the end of their packet Next Generation science standards: NGSS.PS1-1 Develop models to describe the atomic composition of simple molecules and extended structures. Common Core standards: CCSS.ELA-Literacy.RST.6-8.7 Integrate quantitative or technical information expressed in words in a text with a version of that information expressed visually (e.g., in a flowchart, diagram, model, graph, or table).