 Quick View
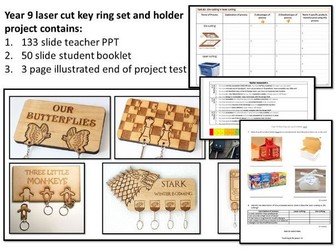
Y9 laser cut key ring set and holder FULL PROJECT
This is a 12 week laser cutting-based project where students will investigate, design and develop a set of detachable key rings and a backboard. 2D Design has been used for this project and also includes a detailed tutorial in lesson 3. It could also be adapted for other types of software.
I am not able to upload 2D Design files on here, but I have:
A student template- to share with students (I ask students to work on the usual A3 layout before resizing)
A template where 15 student’s designs can fit on one sheet of laser ply measuring 600mm x 400mm.
The front A4 template of the packaging
The back A4 template of the packaging
I will e-mail all templates. Obviously, feel free to increase the size of them! Using this student template, they should fit a maximum of 3 key rings on a backboard. Using these templates, you can fit 15 student’s work on a sheet of laser ply measuring 600mm x 400mm.
This is a project that I have developed based on limited access to ICT. It has been carefully planned and includes written / analysis tasks along with the CAD activities. I have tried to make it as obvious as possible on slides 2 and 3 of the teacher PPT of what students can do in the absence of ICT access at any point of the project. I have also include 2 mark points- one midway and one at the end of the projects. Grade descriptors (1-9) have been used and are in the student booklet (assessment 1 on slide 20 and assessment 2 on slide 37). I have also included a project checklist on slide 36 in the student booklet so that students can revisit previous work and improve it. For this, I have also included page references to make it easier for the students.
The project includes:
A 133 slide teacher PPT- This also contains 13 slides of ‘Design movements’ containing information and questions.
A 50 page booklet to be printed black and white. This contains all instructions and some ‘smaller’ tasks. Exercise books / lined paper can be used for the extended analysis tasks (if you choose to use them).
An illustrated end of project test (out of 35 marks).
Note: To create a backboard for the key rings to fit into, I laser cut the outline of the backboard only (not including the key rings). Also, to ensure the product can be hung up and sits offset from a wall, small pieces of dowel can be glued to the backboard when assembled- this also allows it to be hung up and key rings do not come into contact with the wall.
Project break down (could only fit first 5 lesson on here!):
Lesson 1: Design brief
Task 1: Exploring ideas (laptop / sketching in exercise book)
Task 2: CAD/CAM investigation- literacy focus (in exercise book)
Lesson 2: Task 3: Product analysis (in exercise book)
Lesson 3: Task 4: 2D Design tutorial (on computer)
Lesson 4: Successful design investigation (class discussion)
Task 5: Initial ideas (with ICT access)
Lesson 5: Task 6: Developing ideas with ICT access)