 Quick View
Clay art. 3D sculptures
A complete KS2 clay art unit that teaches children how to design, build, and decorate a clay pot using real ceramic techniques. This artist‑inspired sequence blends sculpture, texture, pattern, and 3D form, giving pupils a hands‑on introduction to armatures, score and slip, and surface design.
What’s Included
Teaching Slides for all three lessons
Knowledge Organiser with artist biography, key facts, and visual examples
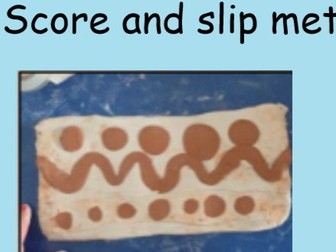
Key Vocabulary — armature, score, slip, texture, pattern, form, structure, join, surface
Clear Learning Intentions and success criteria
WAGOLL Images to support modelling and expectations
Evaluation Sheet for reflection on design choices and technique
Artist‑inspired prompts and background information to deepen cultural and creative understanding
Lesson Sequence
Lesson 1 — Use an Armature & Score‑and‑Slip to Create a Clay Pot
Children learn how artists build strong structures using armatures. They practise the score and slip method to join clay securely and begin forming the base of their pot. This lesson builds confidence with 3D form, structure, and construction techniques.
Lesson 2 — Experiment with Techniques & Design a Clay Pot
Pupils explore a range of clay techniques inspired by the featured artist. They sketch and plan their own pot design, experimenting with shape, form, and creative problem‑solving. The focus is on artistic intention, design thinking, and material exploration.
Lesson 3 — Apply Texture & Pattern to Decorate a Clay Pot
Children apply their knowledge of texture, pattern, and surface detail tocreate their final piece. They use tools to create repeated patterns and carved textures. The lesson ends with structured reflection using the included evaluation sheet.