


In this full scheme of work, designed for a series of two-hour double-lessons, students develop a Mars Rover for NASA based on a standard VEX design. They learn about the components of a robotics system including control units and data communications, and work through a design process towards a prototype. The VEX robotics system is modular, allowing for students to create a common design and then develop their own ideas.
The lessons are as follows:
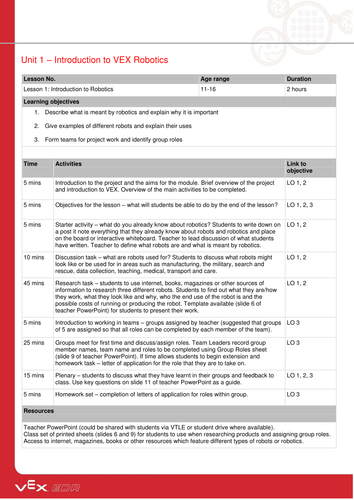
*Lesson 1: An introduction to robotics and the context of robotic space exploration, specifically a Mars rover. It includes an overview and a definition of robotics, and a research task.
*Lesson 2: Students investigate the mechanical components that comprise the modular VEX system. They work in teams to build a ‘ClawBot’, a basic wheeled robot with a movable, clawed arm.
*Lesson 3: Electrical wiring and control circuitry is added to the robot, which is then tested. Team task-management approaches are used to ensure everyone has an active role. An optional activity involves programming the robot using RobotC, a programming language specifically designed for the VEX microcontroller. An extension research task examines the work of NASA.
*Lesson 4: This lesson delves into the NASA design brief – to prototype a robot for exploring Mars. Students work to produce a design specification based on their product research, and sketch ideas.
*Lesson 5: Students present their design ideas to their team, and a joint design is decided upon. They make notes in an engineering notebook, recording how and why decisions were made. Teams may start to build their chosen design.
*Lesson 6: Students create their prototype robot and have the chance to add sensors to it. They may also program the robot to act autonomously. Students evaluate their solutions against their design criteria.
*Lesson 7: The robot is fully tested against the team’s criteria, and prepare a presentation. Team leaders assign roles to individuals to ensure they work to deadlines.
*Lesson 8: Teams make their presentations to an ‘expert panel’ made up of teachers, STEM Ambassadors or others. They then review their presentation and the project itself.
The lessons are as follows:
*Lesson 1: An introduction to robotics and the context of robotic space exploration, specifically a Mars rover. It includes an overview and a definition of robotics, and a research task.
*Lesson 2: Students investigate the mechanical components that comprise the modular VEX system. They work in teams to build a ‘ClawBot’, a basic wheeled robot with a movable, clawed arm.
*Lesson 3: Electrical wiring and control circuitry is added to the robot, which is then tested. Team task-management approaches are used to ensure everyone has an active role. An optional activity involves programming the robot using RobotC, a programming language specifically designed for the VEX microcontroller. An extension research task examines the work of NASA.
*Lesson 4: This lesson delves into the NASA design brief – to prototype a robot for exploring Mars. Students work to produce a design specification based on their product research, and sketch ideas.
*Lesson 5: Students present their design ideas to their team, and a joint design is decided upon. They make notes in an engineering notebook, recording how and why decisions were made. Teams may start to build their chosen design.
*Lesson 6: Students create their prototype robot and have the chance to add sensors to it. They may also program the robot to act autonomously. Students evaluate their solutions against their design criteria.
*Lesson 7: The robot is fully tested against the team’s criteria, and prepare a presentation. Team leaders assign roles to individuals to ensure they work to deadlines.
*Lesson 8: Teams make their presentations to an ‘expert panel’ made up of teachers, STEM Ambassadors or others. They then review their presentation and the project itself.
Something went wrong, please try again later.
Exccellent starter and base for new resource
Report this resourceto let us know if it violates our terms and conditions.
Our customer service team will review your report and will be in touch.
£0.00