Cubism powerpoint and topic introduction - powerpoint is focused on research around the art movement but allows students to create a title page for this topic.
To begin comparing artists’ within the Cubism movement.
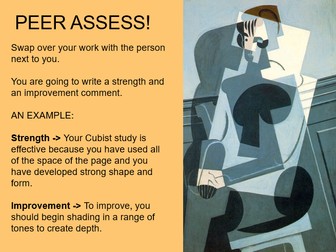
Examples of successful title pages included - students should include key facts as well as drawings to create an effective title page for this project.
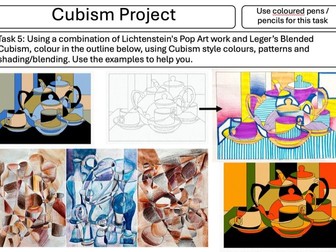
This booklet allows students to explore the Cubist art style through a series of different art activities. Including colouring, drawing and designing, and research tasks, students will learn about Cubism, and practice applying this to a range of activities while exploring shape, proportion and composition.
Useful to print individually for cover lessons or for general lesson time. This could also be used as a PowerPoint presentation for teaching the topic.
This worksheet would be most suitable for Key Stage 3.
Miss K Jenkins :)
All resources have been designed, created and/or constructed by myself, all used in my own teaching currently and in the past.
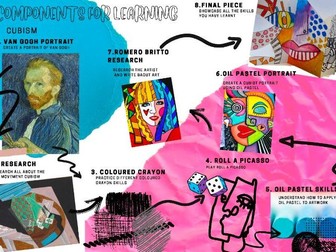
Cubism project including:
Exploring colour and Romero Britto/Van Gogh and is a mixed media paper sculpture for the final outcome.
Powerpoint with do now tasks
booklet with all tasks and assessments
knowledge organiser
homework tasks
Supporting materials
** A 3-4 hour art project based on the famous artist 'Paul Klee'.
** Step by step instructions provide your students with an innovative way of creating some Cubism artwork!
** 20-slide PowerPoint.
** Fully editable.
Leading on from Bottle Drawing lesson - students to complete a Cubism inspired collage.
Powerpoint includes:
Introduction to what collage is.
Links to Cubism art form and relevant artist’s.
Visual examples both from Artists and Student examples (with written success criteria also)
Evaluation questions with sentence starter examples.
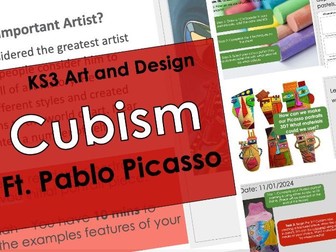
Cubism - Portrait Project (Pablo Picasso Focus) | KS3 Art & Design
This full KS3 unit introduces students to Cubism through the work of Pablo Picasso, giving pupils the chance to explore one of the most influential art movements of the 20th century. Suitable for Year 7, 8, or 9, the project combines critical analysis, artist study, and practical outcomes to help students develop both creative and analytical skills.
What’s Included:
Complete scheme of work (editable unit plan for 10–12 weeks)
Lesson-by-lesson PowerPoint with structured teaching guidance
Artist study tasks on Picasso and the development of Cubism
Critical analysis activities to build evaluative skills
Practical project – create a Cubist-inspired self-portrait or portrait piece
Assessment rubric aligned to lesson objectives and outcomes
Differentiation ideas to stretch or support learners
Learning Aims & Outcomes
Understand the key features and history of Cubism
Explore Pablo Picasso’s style and techniques
Develop confidence in critical analysis and written responses
Experiment with composition, abstraction, and portraiture in personal work
Apply research, design, make, and evaluate skills across the unit
Why This Resource?
Ready-to-use, editable, and time-saving
Flexible length – can run as a full term project or be adapted for shorter study
Includes both theory and practical elements, ensuring well-rounded learning
Encourages creativity while deepening understanding of modern art movements
This engaging project allows students to explore Picasso’s legacy while creating their own unique Cubist portrait, combining research, analysis, and creativity in one complete unit.
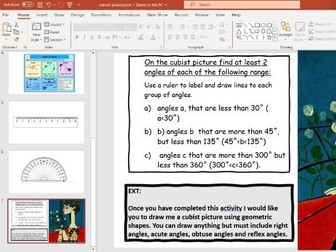
Upper Key Stage 2 PowerPoint to support a lesson about measuring and understanding different angles using Cubism. Comes with word document with pictures for printing. Powerpoint has pictures, definitions and questions.
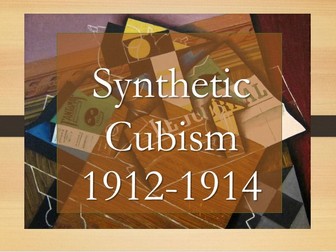
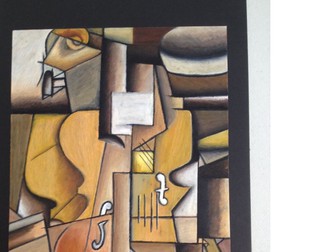
This PowerPoint is a complete intro unit on Synthetic Cubism which can be used for KS3 and (I)GCSE. The PowerPoint breakdowns the styles and techniques of Synthetic Cubism into simple steps which build up towards a single final piece. The final piece of work encompasses a breakdown of the four main characteristics in Synthetic Cubism. There are copyright free art historical images and quality classroom examples provided. Also included is a marking scheme and marking vocabulary for the project.
This PowerPoint is a complete KS3/(I)GCSE unit on Synthetic and Analytic Cubism. The PowerPoint details the total project breakdown in which students are to mimic the style and techniques of Synthetic Cubism in a final piece. The final piece of work encompasses a breakdown of the 5 main characteristics in Synthetic Cubism. This resource is easy enough to use for those with no formal art training. There are art historical and quality classroom examples provided for each characteristic. Marking schemes and vocubulary are included.
3x lesson powerpoints.
Introduction to Cubism - analytical and synthetic.
Comparison of Picasso and Braque.
Artist analysis lesson on Picasso’s work and Roll-a-Picasso worksheet.
This unit of work, encapsulated in a PowerPoint presentation, looks at the formal elements of art and gives examples of how to apply them to cubist art. it also contains advice on student self assessment, how to improve home work and vocabulary revision.
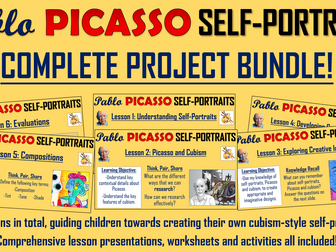
These engaging and purposeful lessons guide children towards creating their own Pablo Picasso cubism-style self portraits.
Included is a complete series of six comprehensive lessons:
Lesson 1: Self-Portraits
-Define self-portraits and understand why they are important;
-Reflect on the key meanings behind some of the world’s most renowned self-portraits;
-Think about their own identity and consider how their features may be shown in self-portrait through colours, shapes and symbols.
Lesson 2: Picasso and Cubism
-Use effective research skills and a research template to find out key information about Pablo Picasso’s life;
-Analyse cubist paintings and understand the key features of the cubist movement;
-Consider how facial features can be presented in the cubist style.
Lesson 3: Exploring Creative Ideas
-Recall important facts about self-portraits, Picasso and cubism;
-Consider how they can present each facial feature in the cubism style;
-Reflect on the feeling, tone and effect of their sketches, deciding on which ideas to develop further in the next lesson;
Lesson 4: Developing Creative Ideas
-Consider, adapt and edit the use of lines and shapes in their designs/ sketches;
-Develop the use of objects, symbols and colour in their work;
-Put all of the ideas together from the sessions thus far to produce a final draft design.
Lesson 5: Compositions
-Understand the key term ‘composition’ and learn about their creative freedom to organise concepts on the page;
-Create their compositions, following clear and precise instructions (provided);
-Learn about different types of brushstrokes that were utilised by Picasso for effect within his own cubism self-portraits;
Lesson 6: Evaluations
-Act as ‘art critics’, expressing their likes and dislikes about art compositions;
-Follow a precise success criteria (provided) to determine the success of their own and their partner’s compositions;
-Put all of the ideas together from all of the lessons in the unit to comprehensively evaluate their own learning, using a provided framework.
Included are eye-catching and comprehensive PowerPoint presentations which guide the learners through the project and provide a wealth of information. All worksheets, activity sheets and templates are provided in both Word and PDF.
These lessons were originally created for children in years 5-6, but may be adapted for slightly older and younger year groups.
This powerpoint focuses on further gaining an understanding of Cubism and its use of multiple viewpoints.
Students analyse Analytical examples of Cubism and write this in their book and refer to different key terms to use in Cubism like, multi-faceted, layering, multi-viewpoints, fragmented, geometric shapes. Terms are given ready to print and examples of analytical works ready to print.
Students are also shown how Picasso simplifies and stylises his subjects.
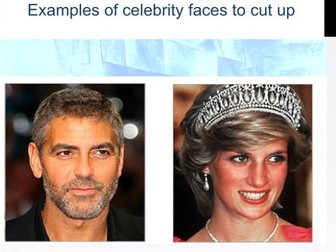
There are examples of some celebrity pictures where students need to break this up into geometric shapes and re-collage the shapes on an A4 paper.
This is a c omposition to trace and where students will need to paint in a further lesson, compose an outcome to paint and analyse into a cubist analytical painting.
Students to gain an understanding of Analytical Cubism and how to fragment a picture into geometric shapes
To make a collage of a famous celebrity artist and to complete presentation on Cubism in books.
After this task students simplify this collage into a tracing of collage getting ready to paint this into simplified shapes. See Cubist No.3.
SUMMARY OF THE FULL PROJECT BELOW
This is a series of powerpoints 5 lessons for students to learn to paint a Cubist painting using a celebrity picture and complementary colours. Students to gain an understanding of Analytical Cubism and how to fragment a picture into geometric shapes and then learn to paint it in complementary colours. Students then further develop this into a 3D sculpture and make a construction mobile cutting a copy of the painting into shapes.
This is part of a set 5 powerpoints on Cubism, painting skills and colour mixing and constructing a 3D sculpture.
This attached Powerpoint deals with the development of the 3D sculpture
Powerpoint 1
Using a drawing of face break this up into geometric shapes and compose an outcome to paint and analyse a cubist analytical painting and develop and understanding of Cubism
Powerpoint 2
Explore a mixing of colours, especially complementary colours and develop an understanding of contrasting colours
Powerpoint 3
Practice painting skills and applying paint smoothly
Powerpoint 4. Painting skills using a card
Poweerpoint 5.
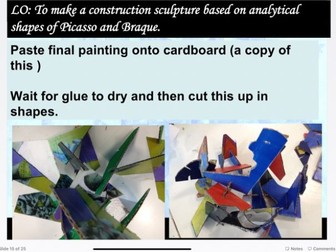
Simplify and construct a 3D analytical sculpture from your painting and evaluate your putcome.
The powerpoint gives instructions and examples to show how to cut and join this. Firstly pasting on cardboard a copy of the painting and then cutting this up in shapes and building a construction of form as a 3D sculpture
This then becomes a construction of a 3D sculpture using cardboard to make a mobile or standing sculpture based on Cubism.
To paste painting onto Cardboard Ceareal box and to paint the back of the box
To finally construct with glue gun to form a hanging mobile.
Evaluation of project
This is a series of 5 powerpoints where students to learn to paint a Cubist painting using a celebrity picture and complementary colours.
Students to gain an understanding of Analytical Cubism and how to fragment a picture into geometric shapes and then learn to paint it in complementary colours.
Develop this into a 3D sculpture and make a construction mobile cutting a copy of the painting into shapes.
PowerPoint presentation that introduces students to the style of Cubism. The presentation is a guide for a unit of work with example material. The project uses Toys to create observational drawing and painting based on the style of Cubism.
These engaging and purposeful lessons guide children towards creating their own Pablo Picasso cubism-style self portraits.
Included in this resource pack are the first two lessons in a series of six lessons. They focus on helping children to understanding the meanings behind self-portraits, researching about Picasso’s life and understanding the cubism movement/ style.
This first lesson helps children to:
-Define self-portraits and understand why they are important;
-Reflect on the key meanings behind some of the world’s most renowned self-portraits;
-Think about their own identity and consider how their features may be shown in self-portrait through colours, shapes and symbols.
This second lesson helps children to:
-Use effective research skills and a research template to find out key information about Pablo Picasso’s life;
-Analyse cubist paintings and understand the key features of the cubist movement;
-Consider how facial features can be presented in the cubist style.
Included are eye-catching and comprehensive PowerPoint presentations (11 slides each), and the identity worksheet/ research templates required for the tasks (in both Word and PDF).
These lessons were originally created for children in years 5-6, but may be adapted for slightly older and younger year groups. The other lessons in the series are available on this site in packs of two (like this resource), or the entire unit of lessons can be purchased as a part of a bundle.
Ideal for Year 9 and GCSE.
Lesson by lesson term PowerPoint on the artist Juan Gris.
Also covers an exercises on Mark Making and Pattern Techniques.
Students will study the work of Juan Gris.
Covering excercises composition, tone, shape and form.
For students to produce cubist inspired artwork, in a variety of different medias/materials.
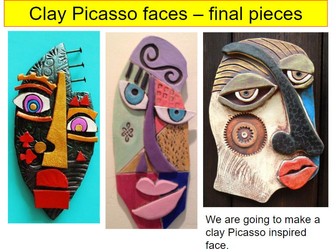
A 12 week Powerpoint of lessons. Design and make a Clay face inspired by Picasso and Cubism.
The Powerpoint contains the following:
Lesson 1 - Drawing an enlargement of a Picasso face
Lesson 2 - Make a collage of a cubist face
Lesson 3 - Make a cardboard relief cubist face
Lesson 4 - Initial ideas for clay face
Lesson 5 - Final idea for clay face
Lesson 6+ - Make the final clay face