


This project encourages students to build upon their in-depth knowledge and experience of working with VEX EDR in unit 1 and unit 2, by integrating a wider range of sketching, computer aided design and prototyping skills. The aim of the project is to develop an outcome not possible in the current platform portfolio of parts, and produce high quality and functionally successful engineered solutions.
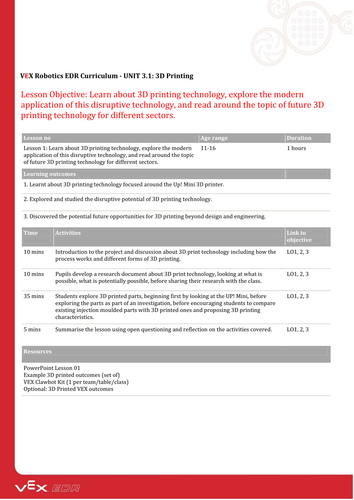
*Lesson 01 – Pupils will learnt about 3D printing technology focused around the Up! Mini 3D printer. They will explore and study the disruptive potential of 3D printing technology, and discover the potential future opportunities beyond design and engineering.
* Lesson 02 – Pupils will learn about a sketching technique that will support communication skills, adapt the designs of others to improve ideas about design, and developed the ability to communicate to others effectively.
* Lesson 03 – Pupils will learn how to build a VEX Clawbot using 3D printed parts. Issues associated with micron level tolerance of parts that are 3D printed are explored.
* Lesson 04 – Pupils will develop ideas from simple into final parts with a functional focus. They will then discuss the strengths and weaknesses of new component parts.
* Lesson 05 – Using a working Clawbot, students modify the build by adding the aesthetic parts and fitting them using the range of tools. These are then tested to see how the different parts perform and evaluate through repeated testing on a part of process.
* Lesson 06 - Students conduct an analysis of VEX parts to consider what their function and aesthetic are. Starting from the project brief, Students sketch and develop their ideas moving from designs on paper to CAD (Autodesk Inventor) before committing parts to 3D printing, assembly and testing. At the end of the project, students evaluate their 3D printed parts range, and consider how they could have designed and made better.
Something went wrong, please try again later.
Really like the way it moves you forward with each lesson
Report this resourceto let us know if it violates our terms and conditions.
Our customer service team will review your report and will be in touch.
£0.00