

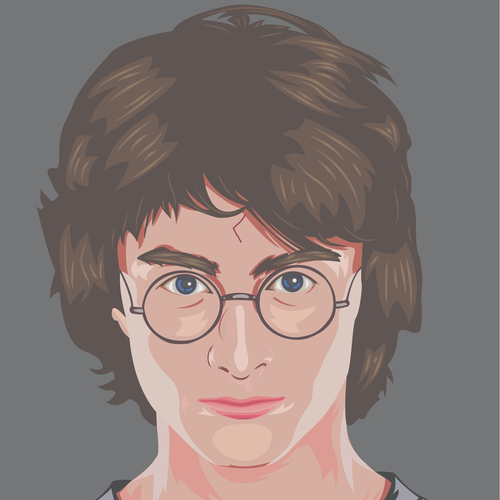


HARRY POTTER - Whole Class Art Activity - Split Picture Display (25 Squares that create one image!)
Whole Class Art Activity - Split Picture - Instructions
Creating a collaborative picture split into 25 parts can be an engaging and fun activity for a class of children. Here’s a step-by-step guide on how to do it:
Explain the concept of creating a collaborative picture. Let them know that each of them will be responsible for colouring in / sticking scrunched coloured paper on one part of the larger picture, and when combined, all the parts will form one complete image for a great display.
Materials Needed
• Show the PowerPoint with the original split image in full colour on the screen.
• Print the 25 faded colour squares (I like to print on thick paper / card).
• Children select / Teacher selects which children have which square (there are 25 squares, if you have more children, they could share a square, if you have fewer children some could have two squares each – this is a good way to differentiate your art lesson).
• Felt tip pens (and / or) scrunched up coloured paper and PVA glue (this looks more effective!) or even acrylic paint (higher year groups / more able artists).
• Children then colour / stick on their individual square – this is simple as they follow the guidelines on the washed-out page image, but please tell them to be as accurate as possible so that when it is complete it makes one final image of all 25 squares!
Encourage the children to use vibrant colours and to stay consistent with the overall theme or colour scheme of the image. After colouring, allow some time for the children to review their work and make any necessary touch-ups or corrections. *
Assembling the Picture
Once all the sections are completed, carefully arrange them together to form the complete image. Use tape on the back of each of the panels to align them OR stick the squares onto a tough piece of cardboard in alignment.
Display and Appreciate!
Once the picture is assembled, display it in the classroom or a common area where everyone can admire their collective masterpiece! Take a moment to appreciate each child’s contribution and celebrate the collaborative effort!
By following these step-by-step instructions, your class can successfully create a picture split into 25 parts that come together to form one cohesive image. This activity promotes teamwork, creativity, and attention to detail among the children, and the displays look truly magical!
Note: I have also uploaded the 25 individual squares as image files… My class also enjoyed when I printed these and they simply used it as a jigsaw activity… we now have have one laminated in class for this purpose!
Get this resource as part of a bundle and save up to 66%
A bundle is a package of resources grouped together to teach a particular topic, or a series of lessons, in one place.
Something went wrong, please try again later.
This resource hasn't been reviewed yet
To ensure quality for our reviews, only customers who have purchased this resource can review it
Report this resourceto let us know if it violates our terms and conditions.
Our customer service team will review your report and will be in touch.
£4.00