Hero image

Miss Hurst

Average Rating3.81
(based on 36 reviews)

I am a qualified Secondary Design and Technology teacher. I am based in Bristol and have taught at a variety of school settings including highly academic, private day school, multi-cultural, private boarding school and local, state Academy school. Outside of teaching in schools I have also run workshops for children and adults on a range of craft and cooking based activites.

I am a qualified Secondary Design and Technology teacher. I am based in Bristol and have taught at a variety of school settings including highly academic, private day school, multi-cultural, private boarding school and local, state Academy school. Outside of teaching in schools I have also run workshops for children and adults on a range of craft and cooking based activites.
Weave worksheet
MissSHurstMissSHurst

Weave worksheet

(3)
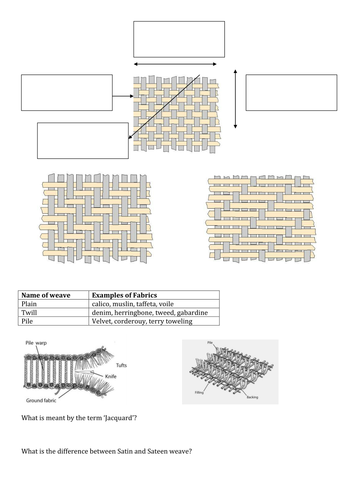
I am a PGCE student, any comments on the resources I have made (positive or negative) would be very helpful. If you choose to download -why? If not - why? Thank you :) For students to fill in the blanks Bias, Warp, Weft and Selvedge Also to label the weave diagrams Plain, Twill and Sateen. The 2 questions I used as a homework task.
Yarn theory powerpoint and worksheet
MissSHurstMissSHurst

Yarn theory powerpoint and worksheet

(4)
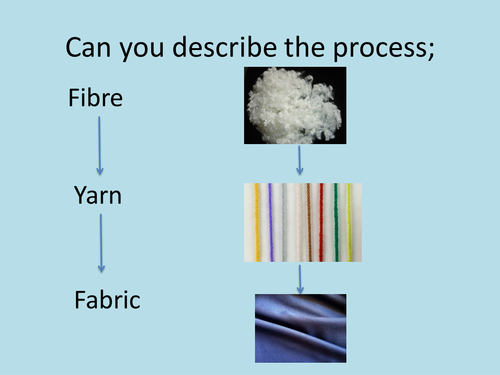
Powerpoint showing each of the fancy and bulked yarns to cover for GCSE and Alevel theory. My lesson focus was on students being able to explain the process from fibre - yarn - fabric. Students were given a variety of commercial fancy yarns to pull apart and find out how they thought they had been produced. The yarn investigation worksheet is where students recorded their findings by stapling the samples in the first column and explaining how they have been made.
Chopping Board Challenge
MissSHurstMissSHurst

Chopping Board Challenge

(13)
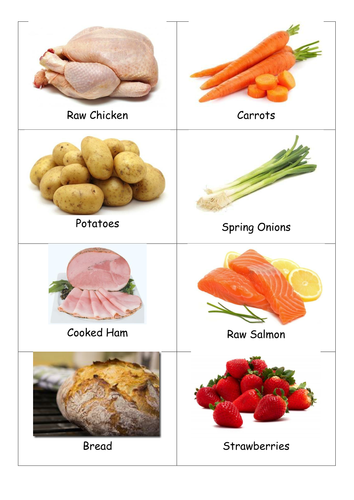
I am a PGCE student, any comments on the resources I have made (positive or negative) would be very helpful. If you choose to download -why? If not - why?Thank you :) Students are sat in 'table teams' with each colour chopping board laid out in the middle of each table. They are told to take note of the information displayed on the first slide. The food cards are placed face down, slide 2 is shown. The aim is for students to place the correct food item on the colour chopping board that should be used to prepare it. When finished all members of the team must put their hands up. I take note on the order of finishing then check their teams answers in that order, correct answers are displayed on the board.
Natural fibres and yarn spinning
MissSHurstMissSHurst

Natural fibres and yarn spinning

(2)
Suitable to set for a homework or digital learning. Youtube video to watch and worksheet attached to fill in based on the information. Covers textiles keywords related to natural fibres and spinning into yarn, also features Toby the angora rabbit and Yogi the puppy!
Video Demonstration - How to make Chocolate Brownies
MissSHurstMissSHurst

Video Demonstration - How to make Chocolate Brownies

(0)
Simple brownie recipe practical demonstration - perfect for teaching in a 1 hour lesson in school or for setting as home learning Miss Hurst and Mrs Goodwin demonstrate how to make Chocolate brownies Ingredients and process; 125g Butter 125g Plain flour 200g Caster Sugar 30g Cocoa powder 2 eggs optional; 100g Chocolate chips or sultanas Sprinkling of icing sugar Preheat oven to 200°C and line tray with greaseproof paper Pour all dry ingredients into a mixing bowl (including optional chocolate chips and/or sultanas) Melt butter in the microwave Tip liquid butter and 2 eggs into mixing bowl with dry ingredients Mix to combine Pour mixture into the centre of tin then ease to the edges with a spatula Bake for 20minutes Remove from the oven, leave to cool then cut into pieces Dust with icing sugar to serve Share this brownie video as a demonstration for your class; https://youtu.be/9JPqogMzihs
Knitting worksheet
MissSHurstMissSHurst

Knitting worksheet

(1)
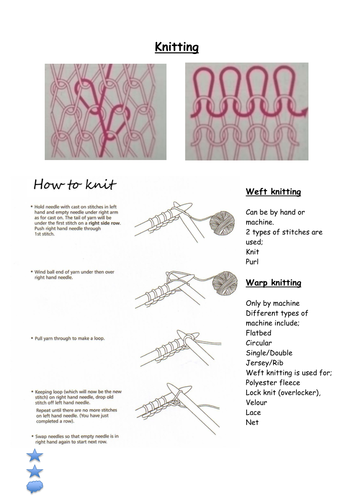
Students to label diagrams ‘Weft’ and ‘Warp’ knitting. Includes instructions for hand knitting, info on types of knitting included in the GCSE specification. 2 stars and a wish symbols at the bottom of the worksheet for a plenary.
How to make lemon and raspberry cheesecake
MissSHurstMissSHurst

How to make lemon and raspberry cheesecake

(0)
Simple lemon and raspberry cheesecake recipe practical demonstration - perfect for teaching in a 1 hour lesson in school or for setting as home learning Miss Hurst and Mrs Goodwin demonstrate how to make a lemon and raspberry cheesecake Ingredients and process; 175g biscuits 60g butter 300g cream cheese 150ml double cream 1 lemon (unwaxed) 1 heaped tbsp caster sugar 100g raspberries (fresh or frozen) Optional extras; lemon juice 2 tbsps Icing sugar Crush biscuits for the base. Wash your hands then break up into a mixing bowl, then place into a plastic bag and use a rolling pin or jar to crush inside the bag Tip crushed biscuits back into the mixing bowl and finish off any large pieces with your rolling pin or jar Melt butter in the microwave Cover tin using cling film then push into the corners all around the inside of the tin Tip liquid butter into crushed biscuits and mix thoroughly. Tip into the cling filmed tin and press down firmly with a spoon compact the mix and form the base Place tin in the fridge to chill Zest lemon into small bowl Cut lemon in half and juice - place juice with the zest in the bowl (ensure any pips are removed) Add a heaped tablespoon of caster sugar into lemon zest and juice Tip double cream into a bowl and use a hand balloon whisk to whip slightly (just a little thicker) Add all cream cheese to double cream and continue to mix with hand balloon whisk - will be tricky at first but will come together Add lemon zest and juice to cream and cheese then whisk. Use a clean teaspoon to taste the mix and add more lemon juice if necessary Add a couple of handfuls of raspberries (around 2 thirds leaving the rest to make raspberry coulis) to the bowl and mix carefully with a spoon Take biscuit base from the fridge and tip creamy, raspberry cheese mixture on top. Smooth the top with a spoon or pallet knife Place cheesecake back into the fridge to chill For the coulis; Place remaining raspberries into a sieve Use the back of a spoon to crush the raspberries through the sieve and into a small bowl below Add a couple of tablespoons of icing sugar and mix thoroughly Once the cheesecake is fully chilled (after at least an hour, or overnight) remove from the fridge and use the cling film to lift out of the tin to serve with the raspberry coulis Share this lemon and raspberry cheesecake video as a demonstration for your class; https://youtu.be/3YlwETNnYqA
How to make bean burgers
MissSHurstMissSHurst

How to make bean burgers

(0)
Simple bean burger recipe practical demonstration - perfect for teaching in a 1 hour lesson in school or for setting as home learning Miss Hurst and Mrs Goodwin demonstrate how to make bean burgers Quantity for 4 burgers Ingredients and process; 1 small onion 1 tin butterbeans 100g cheese (any type) 1tbsp oil 1 egg aprox. 100g plain flour aprox. 100g breadcrumbs herbs and spices Preheat oven to 200°C Crack egg onto plate or tray and whisk with a fork Set up plates or trays in order; flour, egg, breadcrumbs 1tbsp oil in cold pan or wok Very finely dice onion (Brunoise) using sharp knife and green chopping board. Remember bridge and claw! Tip onion into cold pan of oil, turn hob onto medium/high heat and sauté (heat whilst stirring every so often until onion is soft) Whilst onion is cooking, drain tin of butter beans Mash butter beans with potato masher Check onions - they should be finished Add mashed butter beans, grated or crumbled cheese and herbs and spices to wok or saucepan with the sautéed onions Mix thoroughly Use a knife to split the mix into 4 equal parts Wash hands then use to mould burgers and place on greaseproof paper Oil a baking tray ready for the bean burgers Panné - use the ‘dry hand/wet hand’ method. Take each burger and coat in first the flour, then the egg then the breadcrumbs and place onto the greased baking tray Spray or brush a little oil over the top of the burgers then place in the middle of your preheated oven to cook for 20-25mins - check halfway through cooking to see if they need turning. Share this bean burger video as a demonstration for your class; https://youtu.be/l2xZDNQM-RU