Teaching Art is a feast into a of colour, line, texture, space and shape. By encouraging a visual exploration in my learning I love developing a creative approach to learning in the classroom. By encouraging different techniques and an understanding of art I hope to help students appreciate visual learning more. I hope you enjoy my uploads and can use them. Please contact me if you require any further information.
Teaching Art is a feast into a of colour, line, texture, space and shape. By encouraging a visual exploration in my learning I love developing a creative approach to learning in the classroom. By encouraging different techniques and an understanding of art I hope to help students appreciate visual learning more. I hope you enjoy my uploads and can use them. Please contact me if you require any further information.
To explain various printing techniques - like relief printing, mono-printing and silkscreening. Slides showing a history of printmaking, from Early letterpress, to Japanese, Picasso, Expressionism and Andy Warhol. Students to be shown how printmaking developed in visuals.
There are various historical examples to show the early print works and how they developed.
Also linking to projects for students to get ideas to develop their own work.
Each printing technique has You Tube clips with specific tasks in the presentation.
Student tasks - to write a definition for each style of print. Students to make a presentation in books.
Heading in book
Stick in your prints when they are totally dry
What is … printing?
What types of . _____are there? E.g additive, subtractive?
Give an example a print artist.
Describe your print process. Did you find it difficult or easy.?
Do you like the quality of your printing?
There is a detailed explanation of each of these three types of printing for students to copy and very informative to support printing techniques.
Good for KS 3 but also at GCSE.
A short presentation highlighting the key facts and characteristics of the German Expressionism.
There are references to a number of artists, Edvard Munch, Oskar Kokoschka, Max Beckmann, Erich Heckel, Karl Schmidt-Rotluf, August Macke, Emil Nolde, Otto Mueller.
Expressionism was made up of Der Brucke Art movement and Der Blaue Reiter - there are also examples of these artists linked to Expressionism.
Der Blaue Reiter is Frans Marck and Wassily Kandinsky.
Key examples given with notes about the movement to be used as worksheets for students.
The powerpoint gives key questions to ask under the theme of Self-identity and shows some examples of interpreting oneself in different styles - Picasso, Van Gogh, Gainsborough and Chila Burman. There are questions to use to make an artist study on chosen artist.There is a further brainstorm on what one could make as a final idea which would embody my identity and examples of student’s work.
**What are the Learning Objectives for this project in Art? **
Students learn from examples and a clear understanding to totem poles is explained visually in slides, also different video clips about Totem poles and their story telling. There are slides which give a background to totem poles. Lots of symbols for different animals given on separate slides which could be used ot make the totem pole.
Students through the research into totem poles will gain an appreciation of how religion and spirituality holds in Native American cultures.
Students will be able to communicate experiences, moods, and stories and reflect on their own family history and family tree in a group project.
Students to create images using the elements and principles and design their totem imaginatively.
Using pictures of animals - students can stylise and create a symmetry outcome to use in the building of their animal/sun/bird/man for their totem pole.
Each student completes a different part of the totem pole and students need to work in teams
Students create images in response to objects from a variety of cultural contexts as students look at and watch various ‘You Tube’ video links about the Totem pole story telling.
Students demonstrate awareness of Pacific Coast heritage
The slides give a sequence of classroom activities leading to the making of a cardboard totem pole.
Students use recycled materials and build their animal/bird/sun/man they designed.
There is an emphasis on coloured paper and pasting this into the cardboard and building up the structure.
Students will complete the following:
**Teamwork: **Complete a group totem pole.
Graphic Design: Design a group/tribe logo.
Independent Research: Interview a Family member and research family history
3D Sculpture Design: Design a totem sculpture that represents your family history in 100 years time.
Recycling materials: Students use recycled materials and construct a standing Totem.
Students can embellish and decorate their totem with coloured paper cut outs and black pen line work.
This is for your Year 10 GCSE group and gives a summary of the GCSE course in two sheets. It is a very helpful sheet summarising each objective and the requirements and the amount of pages that are needed in your sketchbook.
There is also the writing framework required for artist analysis - objective one. There is also a brief outline of the principles of design and what students need to look for. Also there are helpful questions to help students evaluate their outcomes.
A must for GCSE Art and Design!!
**Self -Identity portrait project. **
This is lesson 1 where students take their own photo and then start to do a drawing of parts of the face. There are examples of face details and then there is an example of how to scale this up. There is a homework biro drawing task.
(In the Bundle there are other lessons to follow up on this drawing of task, where students have to interpret their face in various artist styles and culturally interpret their own identity. )
Lesson objectives
Objectives
To draw the proportions of the face in your book
To do a photo-shoot and take a photo to use for your portrait drawing where you scale up this picture.
To consolidate how to draw parts of the face.
To do a pencil tonal value
To practise mark-making with a pen
Through out the whole scheme the project
**success criterias **are:
To learn about the proportions of the face
To practise drawing various parts of the face
To draw a portrait drawing using the grid technique
To look at various examples of portrait drawings
To develop a tonal grid and to understand the light and dark planes in a face.
To understand how to do a grid drawing
Students are to develop creative drawing by analyzing and interpreting a variety of selected artists.
Students will produce a drawing showing contextual evidence that supports the assessment criteria for the A Level course.
This powerpoint gives the LESSON PLAN AT TH END OF THE PRESENTATION.
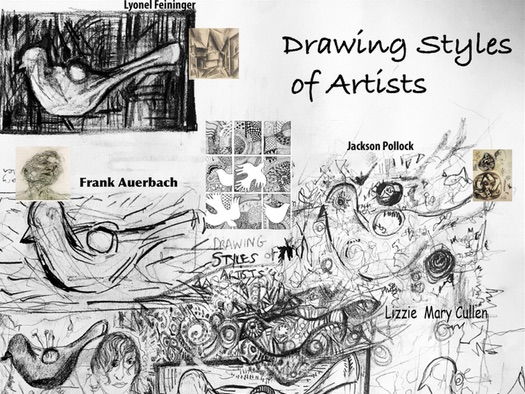
Students to reflect on examples of copies of drawings of different MASTERS and illustrators and begin to analyse the types of shapes, lines and marks.
Develop an understanding of signature styles of particular artists and the way the artist’s signature captures the intrinsic meaning of the artist.
Students to develop an A2 sheet of drawings which shows the different mark making skills of a number of different artists; develop a still-life drawing which support a number of different artists marks.
You must show evidence of research and of investigating and developing ideas. This should include visual work and, if appropriate, annotations or written work. Practical responses to the work of other artists, designers, craftspeople and photographers must show development in a personal way.
ASSESSMENT OBJECTIVE:
develop ideas through sustained and focused investigations informed by contextual and other sources, demonstrating analytical and critical understanding
Analysis Activity- follow Mark-making analysis of artists
Put students into PAIRS give out an example of each of these artists drawing – photocopy to pair
CULLEN AND AUERBACH,
VAN GOGH AND POLLOCK
FEININGER AND GILMAN
NICOLSON AND MICHELANGELO
Students to describe the marks, the quality of the lines and shapes that define the artist.
Analysis Activity Feedback– Choose one of the works and will one of you in the group discuss this with the class. Other students may also add comments.
TASK ACTIVITY Creative Practical Skills independently
Students to choose 2 of the artists discussed or analysed in the groups and try to do a drawing now in the style of those two artists.
With a ‘window frame’ students to draw in the style of the artist in a small frame on their sheet.
Prompts Questions to Evaluate Drawing outcome
What does it remind you of?
What does the work represent?
Have any parts been exaggerated or distorted?
What message does the work communicate?
What kind of marks does the artist use?
What kind of shapes can you find?
What materials and tools have been used?
How does the work make you feel? Does the line, shape, colour affect your mood?
What do you like about it Why? What don’t you like? Why?
How might you take ideas to use in your own work?
What do you know about the artist?
Does the work relate to the social or political history of the time?
Students learn about the Art history styles or a set of Artists and develop a project which has all of these styles in a final outcome. Different themes can be chosen as a subject which then includes all these modern art styles.
In this slide presentation - there are examples of final outcomes:
A ‘Still-life bowl’ with different fruit in different styles
An ‘Interior of a Room’ with areas of the room in different styles and
A ‘Cake Stand’ with cupcakes in different styles.
IN THIS POWERRPOINT THE THEME IS FRUIT AND EXAMPLES GIVEN IN EACH STYLE. THE OUTCOME IS A BOWL OF FRUIT.
In all of these the students combine all the styles to form a display of fruit.
The powerpoint gives an outline of a number of art movements, Futurism, De Stijl, Pop Art, German Expressionism, Cubism, Surrealism, Fauvism and students are asked to do a different style each week with a different technique and develop an outcome.
Some of the possible outcomes are a Bowl of Fruit, an Interior of a room or a Stand of Cup Cakes.
In each of these examples students use a different technique and style to make up their final. Students can work in groups to put this together as a final presentation or can work individually to create their final outcome.
An excellent project and scheme of work for year 8 where students learn a number of skills but also learn about the Art movements and gain a deeper understanding of the story and history of Art.
The presentation gives a detailed background to each style with artist examples and each week these styles can be discussed with the class. The key characteristics of each of the movements are carefully explained so that students gain an understanding of the movement.
This is a powerpoint on the theme Broken and refers to the Eastern concept of Wabi Sabi - where one sees beauty in imperfections.
There are lots of examples to get students to think of broken and the meaning of this and what is beauty?
Students are asked to do a mind map of broken and try to describe situations where something is broken and what the meaning is of this and question its beauty?
Lots of examples of different examples of artworks to show Broken.
If this was a GCSE theme students to use this as prompts to help develop ideas on the theme.
Describe what type of lines, shapes, space, colour and textures do you see in the work. Try to add one word to the element ……………
For example: Wobbly Lines, Dark Colours, Rough Texture, Mathematical shapes
Wide Space
‘We are learning to develop your written work looking at a work of Michael Craig Martin
We are learning to make a presentation of this in a powerpoint:
We are learning to show slides which should include: Artist name, and pictures of his work,
We are learning to write an analysis using questions on our slides
We are learning to make our own response to the work using pencils, pencil crayons and felt tips
We are learning to reflect on the work of Michael Craig Martin and how he has used still-life.’
Research
On the internet students find examples of the work of
Michael Craig Martin
Choose two images by this artist, one you like and one you do not like.
Students answer the following questions and display visually:
'Why do you like the first image?
Why do you not like the second image?
What bit in each photo do you look at first?"
Students Choose one image to analyze and to use as the basis for their own drawing – the one students are asked to copy. Students evaluate:
“What do you like about this artwork?
Which section do you look at first?
How are you going to copy this artwork (remember its your own version it, not a perfect copy)”
Plan the layout of your page first in pencil, carefully. Presentation is VERY important!
Title: ‘Line, Shape & Colour – Michael Craig-Martin.
Decorate your page.
Next copy one of Craig-Martin’s paintings using colouring pencils.Stufents ask the following questions:
What are your most favourite objects?
What objects do you use all the time?
Are there any objects that you can not do without?
Think carefully about these questions and find 4 images of objects on the internet
You may using the internet or take you own photos.
Try out different viewpoints, fill the photo with the object and photograph on a plain background.
We are going to try to trace off the screen or draw objects with a pencil from the screen
Why do we look at things in certain ways?
How can we make objects look interesting?
Can you guess the objects photographed from different angles?
Divide your page into four sections.
Title: Line, Shape and Form/Overlapping and Composition
Now in each box you are to draw in pencil the outline only of your favourite objects. Try to draw the object four times, once in each block and try to draw a different viewpoint each time
Remember to………….
keep the lines neat and clean.
look carefully at the shape and form of each object.
fill each box with the 4 objects and presentation is important.
4. layout and the way you overlap should be different in each block
Find objects at home to use in your Michael Craig Margin
Interpretation or objects on the internet to copy from
Take at least 4-6 objects and try to combine them together
Plan out a rough sketch first………. See example
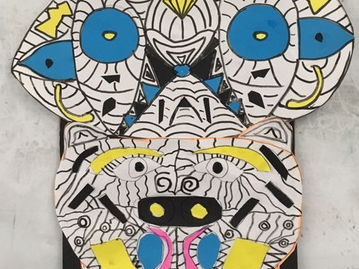
A Key stage 3 project which starts with Figure drawing of class mates - lots of student examples to support and instructions for drawing.
Students then look at modern sculptures and uses them to simplify their figures into abstract shapes. There are once more student examples and clear instructions showing how to simplify. It is important to get students to show the simplification of their figure drawing into an abstract shape.
Students study 4 different sculptural artists - Further task involves doing an artist study on one of the Sculptors: Henri Moore, Anthony Gormley, Barbara Hepworth and Jean Arp and then students make a moodboard of their work. There are sheets for each sculptor showing some info and pictures of each sculptor.
Then there is the making of the sclpture with video clip to explain how to build armature and how to make 3D form using paper mache - there are a lot of good examples of student figures
Students then need to build the figure out of cardboard, papier-mâché, wire, straws and recycled objects and to decorate this with coloured paper, tissue paper and any other embellishments like buttons, beads and string.
Furthermore there is the embellishment of the sculptures…development of design and pattern by looking at Aboriginal Art, Gustav Klimt, African Art, Beatris Milhaze and students have to choose one of these designs to inspire their figure and begin to decorate their figure.
The students then draw out the simplified figure shape with the abstract colourful patterns and present this on a page in their sketchbook.
Finally there is the development of this figure into a hanging mobile looking at the work of Alexander Calder and an evaluation.
A detailed project looking at developing a Still-life project looking at composition, rule of thirds, different techniques for each object with different art styles.
Students firstly, study what is a Still-life and write up a definition for this.
Students then look at what different styles in Art before Modern Art.
Students look in detail at Dutch Still life and the Vanitas still-life.
There is also some information on the Post Impressionist artist Paul Cezanne and his style of brushwork.
A focus on what is still life?, then looking at Pop Art and what is pop Art? Students then answer questions on two Pop Artists: Michael Craig Martin and Patrick Caulfield. Students practise making a background on Pop Art in their sketchbook and answer the questions.
Students develop their own Still-life and are told to bring in objects for their Surreal mixed media Still-life and their are examples of this. Students learn to compose a layout for their still-life final using a Viewfinder and the rules of third, Fibonnacci rule to help them construct a composition. Students develop their own Still-life and are told to bring in objects for their final arrangement.
The emphasis is then to take them through different techniques with each object they brought to class. The techniques included in the project are: Wax and Scratch, Paper collage, Pop Art hard edge colours and outlines, Palette knife painting, Pencil shading and Pen drawing.
There are finally student examples of final outcomes for this project to support the outcome.
year 7
Diagnostic for year 7
Celtic letters
Paper mache plants
Clay Gargoyles
year 8
Cubism
Making Insects - paper craft
Modern Movements - collage and paint
Surrealism - painting project
These are important skills for Key Stage 3
There powerpoints aim to develop the following skills below and in so doing develop confidence in drawing
Line exercises with blind, contour, gestural drawing skills
Upside down drawing -how to copy
Sphere drawing - teaching tonal drawing
Drawing to create an impact with pattern and different techniques - feather drawing
Portrait drawing - looking at proportions in a face drawing
Fun- confident line combining a photo in drawing
A group of different A-level Art projects and tasks to develop
Information to absorb about Art - On Style and Principles and Elements
Examples of student work
Drawing exercises linked to contextual skills
Good for introduction to course.
Academic theorists to use like John Berger and H Wolfflin to encourage discussion and a deeper understanding.
A detailed set of slides showing the basic elements of art used in Art. Exploring what is a point, line and shape and giving colour theory. This is a supportive project for a Foundation course, Year 12 students to develop a deeper understanding of the principles and elements of Art.
This is a lesson for self identity project after students complete the scaling up of their face in pencil.
Using a photocopy students then do a mono-print of their face and later interpret this into an artist style.
There are also some links to You tube clips of different ways to do the mono-print.
To do a set of three monoprints using one’s photograph to draw with
To do 1. a line drawing of one’s portrait carefully following the detail of portrait. Use one’s fingers to create some tonal areas
To do 2. a line drawing of ones portrait and then in the ghost print to draw into this surface and to print this
To do 3 a line drawing of a portrait but to lay a stencil on your ink block before you do the print.
This is a summary for files - a 5 min Scheme of Work to help with having all the essential information required. This is my project Modern Movements - cupcakes where students make a cupcake in various different modern art styles: Expressionism - black and white polyprint, Neo-Impressionism stippling and dots with paint or crayon, Fauvism - splash arbitrary colours and learn how to use water-colour, Realism - pencil shading accurately, Surrealism - make a magical fantasy creature like Miro to go on the cupcake. There is a Scheme of work for this unit.