

69Uploads
13k+Views
494Downloads
All resources
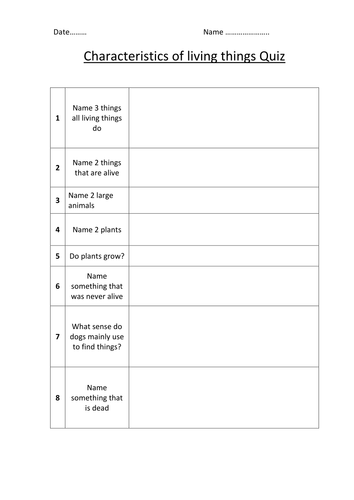
Characteristics of living things
Short simple quiz that allows you to judge the understanding and level of your students
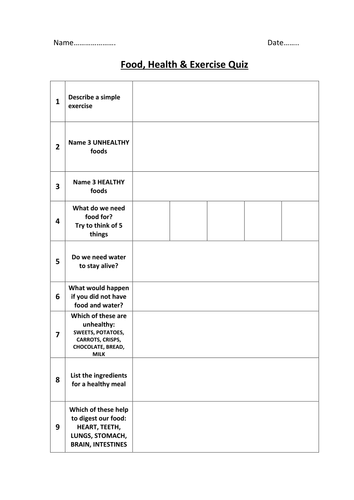
Food, Health and Excercise quiz
Short simple quiz that allows you to judge the understanding and level of your students
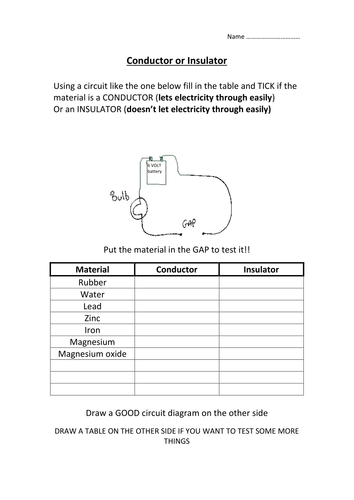
Conductor or Insulator
simple activity to test a variety of materials as well as challenging students to draw the circuit correctly
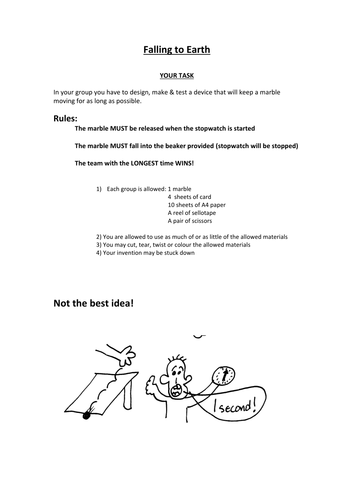
Marble challenge
Students are give some material resources to keep a single marble "moving" before it finally drops into a beaker (plastic)
The challenge is to keep it moving the LONGEST.
With such simple resources and some stop watches the students spend as long as needed to design, test and finally submit an entry for the challenge.Over the years I have seen most students go for the SIMPLE DILUTED GRAVITY technique..lots of long ramps end to end..they do work well if lined up well and prove good physics ideas.
The best solution was wonderful....a set of cones (upsidedown Chines rice pickers hats) with a hole at the point..a marble is released in the top hat and spirals slowly into the middle, drops onto the edge of the next hat below and so on...yes still diluted gravity but elegantly more compact and easier to construct...of course the students will come up with ideas you have never dreamed of........
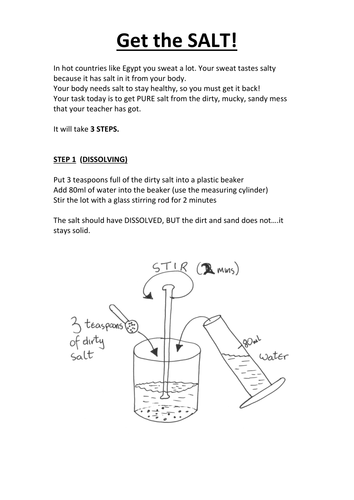
Get the salt
Students are given some dirty salt (salt +sand/soil..whatever you wish) I have even simulated urine(orange juice) to reinforce the plight of poor hygeine in some countries.
The sheet takes students through the 3 steps of purifying the salt.
The final step of evaporating the water using evaporating basins can be tricky if the heat is left on too long.....if no bunsens/heat is available you can just leave the solutions to "dry out" naturally..you can get nice crystals forming over a couple of days.
Why not take the students out for fish and chips later on (keeping a sample of your salt to sprinkle on your chips)
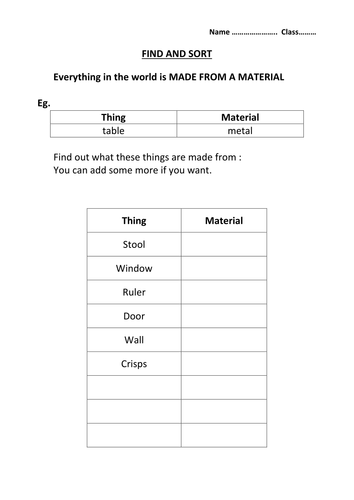
Find and sorting materials
Simple worksheet that allows students to invstigate materials and their uses around school (at home for HW).
Students can look at specific objects(chair) and write down what it seems to be from.
Students are also encouraged to look for the material and say what it is used for...so that materials and properties are approached from both ways.
Then the more tricky task of putting materials into groups, students can classify them in their own way..get ready for some unusual classification techniques.
As an extension students can continue with materials/objects of their own choice..this usually introduces the student's own interests into scientific method.
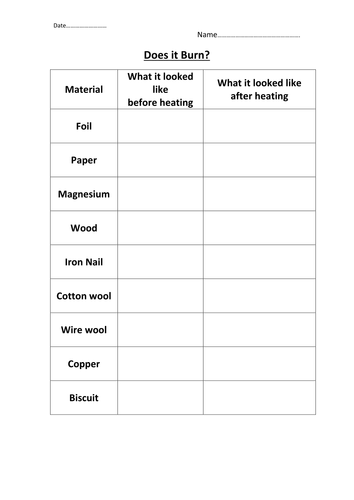
Does it burn?
Lovely activity, not for the faint hearted.
Give students a selection of materials which they examine and describe simply.
They then (with the required H&S) heat the material/object using a bunsen(roaring or yellow...you decide), tongs, observe and describe the material afterwards.
I have done this expt using tea light candles in a classroom, with bench mats and an extra pair of eyes it worked beautifully.
This promotes many aspects of chemical changes, durability, suitability etc etc of materials for specific tasks
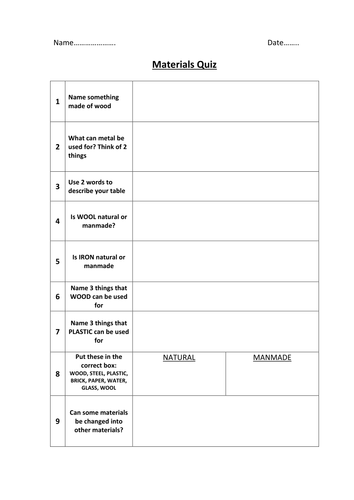
Materials quiz
A simple quiz with well thought out and tested questions intended to stimulate thought and discussion about materials and their properties.
There is no mark scheme as I have found that students come up with unexpected but valid answers which can engage the class and foster interest
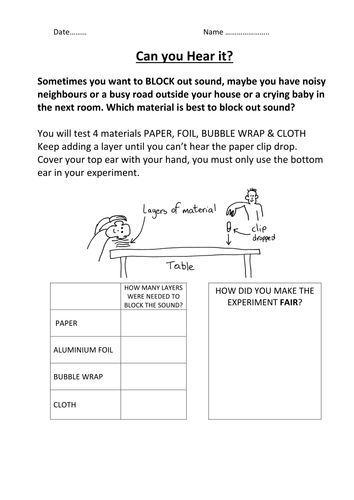
Can you hear it?
With limited resorces this gives students an opportunity to test out "sound proofing"
You just need a table, paper clip, ruler and a selection of materials that may be useful in blocking out the noise from a noisy neighbour
Give the students as much guidance as you like or alternatively, as I prefer, just give them the limited resorces and tell them to devise a "fair" test.
Potential for discussion, competition and looking silly walking around with ear protectors made out of the winning material

Using a microscope
Worksheet that enables students to draw what they see under the microscope, suggested samples are on the sheet but of course you can add your own or even leave some blank for students to suggest.
I have had students hunting for insects, leaves are popular, worms, ants are tricky but petri dishes are helpful, dust, finger nail dirt, etc etc
Students love to enter the world of the microscopic..be prepared to allow a couple or 3 lessons to let their imagination soar.
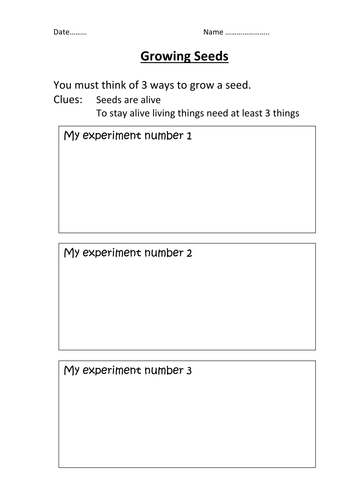
Growing seeds
I love these activities...you must be prepared for all sorts of ideas from the students...but more importantly allow them to try it out..PLEASE DO NOT tell them "this won't work because" and then give them all the answers that are required by law and the curriculum....let them excercise their own problem solving skills and love you for letting them try it out..in a controlled way of course.
Basically they need to find out/ try out/ explore what conditions seeds need to germinate successfully
I have had students burn some seeds with a bunsen as they had seen plants growing after a forest fire..indeed you can discuss thet some seeds need extreme heat before they germinate.
Other ideas students have had:
put in freezer overnight, soak in water, hit with rock, put in acid, keep in dark, keep in light, and so it goes on
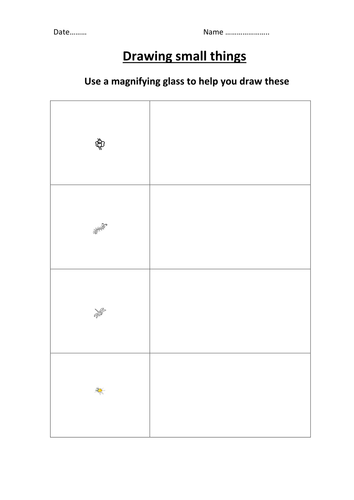
Drawing small things
Students use hand lenses, magnifiers, whatever you have available....this can lead to a "not fair" discussion as some students only have low magnification.
The worksheet contains pictures of very small living things with varrying amounts of legs, antenae, wings, spots, colours...students must use the magnifier to draw as carefully as they can the pictures.
The students can then mark their own efforts after you tell them what detail you expected and they should have spotted..be prepared for lots of moaning and a bit of banter.
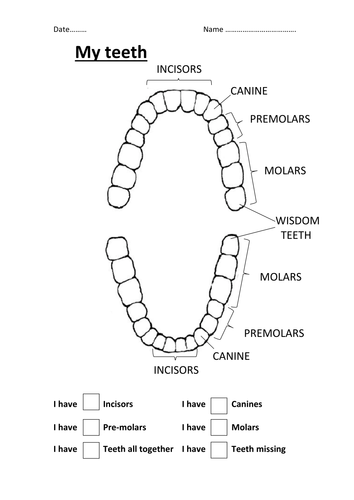
My Teeth
A simple activity which could last a few lessons..depending on what you/the students find.
Possible extra apparatus you could use: mirrors, cotton wool buds to help counting (don't use cocktail sticks unless you have a few hors spare to fill in the incident forms).
The clear picture on the worksheet shows students which teeth are which and all they have to do is count their own and record the numbers. They can try on their own in pairs, use their tongue to keep track or cotton wool buds to "tap" the teeth as they count.
A mirror is very useful.
The activity usyually lends itself to much discussion regarding missing teeth, extra teeth, decay, bad breath, bacteria, diet etc.
I like it because you can just watch the students find out about "themselves" remind them it is not a competition, unless you want it to be.
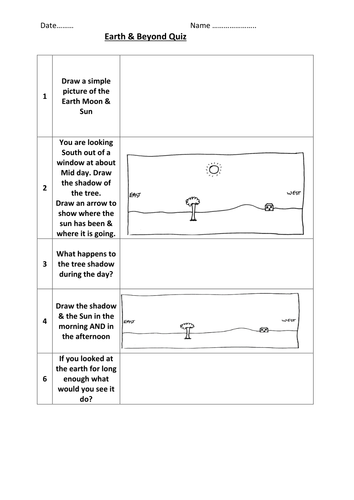
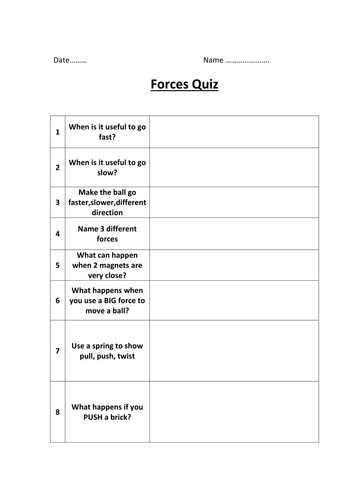
Earth and Beyond quiz
Short simple quiz that allows you to judge the understanding and level of your students
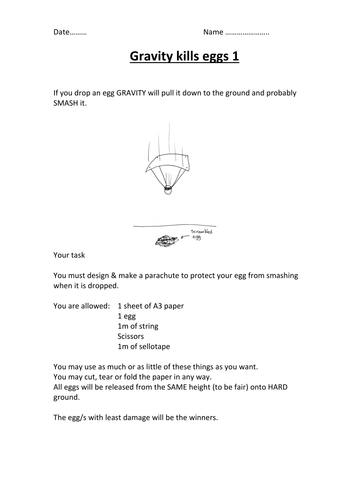
Parachuting eggs
A simple activity which gets students thinking about how things fall and how they can be protected when they hit the floor
EGG SQUASH
This is one of my most succesful Investigations/puzzles/problem solving tasks I produced and used over many years
The main aim is to protect a raw egg. Specif materials are given to "teams" they can use them abuse them, cut, rip, chew or even ignore them, but for FAIRNESS every team has the SAME materials.
This encourages Independent work, team work, prblem solving. It works well with motion studies: air bags, crumple zones etc.
The egg with it's protection is placed (by the students) onto the platform...The tricky news..you need to build a simple platform out of 2 bits of wood and 3 dowel rods..pretty easy really, mine has lasted 20 years but shows it.
The creation is placed on the base, you gently lower the top wooden board on top (sandwich like) and begin to drop a mass (I used a 2kg mass) from higher & higher..until the egg is "SQuashed" you must be able to see/feel the egg after each drop.
Over the years I have had spectacular successes & failures...lots of news paper on floor is useful.
Best ever result a 2kg drop from over 2.5m and the egg survived!..the crumple zone produced was superb.
Ideas the students had..air bag (balloon above egg/ below egg, egg INSIDE balloon and pumped up...great fun!
tubes made from paper/card, padding from ,aterials, hammocks using string etc etc
I spent the first lesson or 2 letting the students just make anything..next lesson...TESTED one by one infront of the class..then if you wish discuss the "Winner" & why?...then repeat expt if you wish for the next couple of lessons.
Before hand I usually did the "squash the egg with yiour hand" (in a clear plastic bag) yes I know you know they are strong but have you actually got the students to do it? got other staff..big bloke staff..crying because they can't...NO rings or fingernails just grip...then after they have tried and failed just drop iton the table to prove it is an egg!
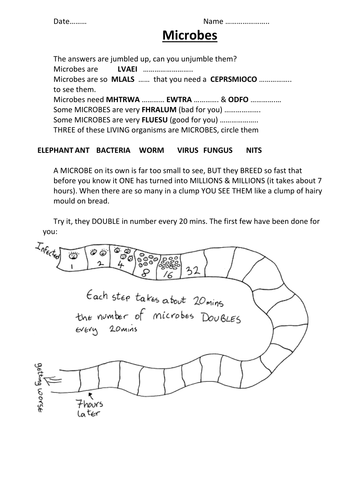
Microbes
Straight forward worksheet that can be used to introduce the world of microbes, especially the fact that they multipky so quickly and can cause proiblems for us, as well as benefits for us quickly
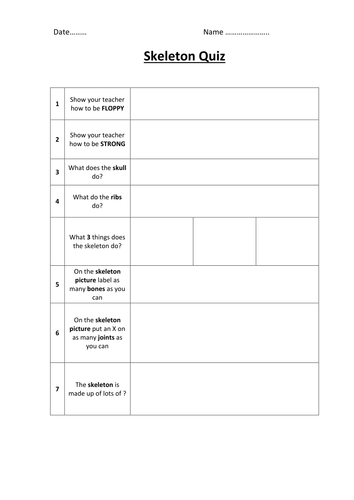
Skeleton quiz
Short simple quiz that allows you to judge the understanding and level of your students
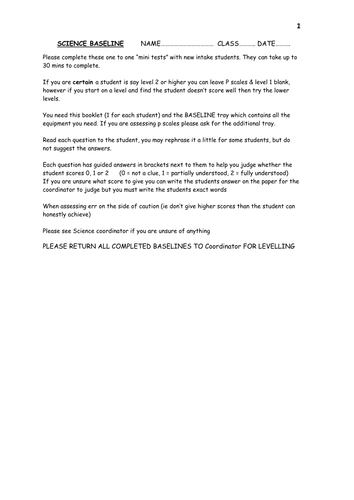
SCIENCE BASELINE assessment from level P4 to 4a (old NC levels)
I have used this assessment with students over the years and modified/improved as time went on.
I believe it to be a good way of assessing students when they are new to the school or even at the end of each year or indeed at any time you wish.
It is based around 4 small assessments for Biology, Chemistry & Physics, so a total of 12 mini-assessments.
Ideally the teacher or assistant spends up to 30 mins (can split the assessment over a few days if you wish but best results have been when the entire assessment is completed at one time) in a ONE TO ONE session.
The teacher/assistant reads the script (this is important as it reduces leading questions and clues to answers), the responses are noted down but in most cases a tick will indicate if the student has understood fully, partially understood or not understood at all.
Minimal resources are needed and are kept in a tray for use at any time. I believe doing or demonstrating science is a beautiful way to engage students, so the assesment uses this.
You will need to source basics like balloons, toy car, rocks etc.
I chose to set up 4 trays so 4 assessments could be completed at the same time (perhaps different classes)
The levels assessed are from P4 up to 4a old levels (which I believe are still useful) you may wish to change the names of the levels to suit your own school.
The script states which resources to use in each question as well as appropriate answers that should be expected for fully, partially and not at all levels of understanding. This allows staff that are not science trained to be able to complete these assessments with the students with relative ease.
Good luck