I am a Primary Science teacher in Perth Australia. I enjoy developing resources for my students that encourage hands on inquiry and investigation. I would like to see my students develop a life long passion for Science and to become active advocates at conserving and protecting the Earth's precious resources.
I am a Primary Science teacher in Perth Australia. I enjoy developing resources for my students that encourage hands on inquiry and investigation. I would like to see my students develop a life long passion for Science and to become active advocates at conserving and protecting the Earth's precious resources.
This is a powerpoint to guide students in an investigation on melting 4 different materials such as
a small piece of cheese
small piece of butter
4 choc buttons
a metal bolt
The powerpoint slides include the components of ‘fair testing’, developing an investigation question, a list of materials, how to set up the investigation and a slide of review questions
This is an interactive investigation where the students are taken to a bushland setting in Perth Western Australia or have access to a bushland area on their school site. The students use the worksheet to guide their investigation about the Noongar season of Birak which occurs in December/January. There are several Noongar Six Season posters that can be purchased or found online. I purchased mine from SERCUL in Beckenham.
Follow this link to my website for some detailed information about Birak.
https://thescienceworkshop.weebly.com/birak.html
Part One
Commence the lesson sharing the story of the ‘little house with no doors or windows but with a star inside’. If you Google the story you will find plenty of versions on the internet.
Part Two
In this investigation each student is given one half of an apple and a ruler.
The students complete the following tasks about the apple
Label your drawing with these words
leaf
stem
core
flesh
skin
seed
My apple has _____________ seeds.
My apple is __________ high.
My apple is ____________wide.
Write two sentences describing your apple.
Part Three
Investigation - What can you put on an apple to stop it from turning brown?
Students conduct their own investigation with an apple to see which liquid is best at preventing it from turning brown.
This is a powerpoint to guide students to conduct their own research about a volcano.
The students can create their own powerpoint or Keynote and use the information on the slides to guide their research. The information on the slides include
Volcano name and location
Which country and continent is volcano?
Type of volcano and number of eruptions over the past 500 years.
Closest city and population
Distance closest city is from volcano and date of last eruption
This Science investigation tests how powerful the sun is at drying out a piece of wet paper towel. Students set up two investigations to compare sunlight and shade. Students record how many minutes it takes for the paper towel to dry.
There is a powerpoint to accompany this activity with a slide of review questions - Sunlight and shade questions.
Bread mould investigation powerpoint
This is a powerpoint to guide your students at setting up a bread mould investigation.
It includes the following slides
what do you know about mould and what things effect mould growth
procedure for setting up the investigation
prediction
variables
developing the investigation question
presenting results and reviewing the investigation.
Bread Mould investigation worksheet - this can be found as a free resource on my shop
Students were placed into teams of three and given a slice of bread to place into a zip lock bag. We then discussed the different locations around the school where they could leave their investigation for a week to encourage bread mould to grow. Do you think bread mould would prefer warm, cold, moist or dry environments? During the week the students were encouraged to make daily observations. At the conclusion of the activity the students completed the remainder of the worksheet.
Bread mould rubric
This is a rubric to accompany my ‘free’ resource called ‘Bread Mould Investigation’.
Some of the assessable outcomes include
Student predicts the conditons and location that are best for mould growth.
Student observes mould on bread samples with magnifier.
Student attempts to draw a labelled diagram of mould growth.
Student uses word wall to assist when spelling difficult or new words.
Student evaluates findings and completes questions.
Student works cooperatively in a team and performs team role.
This powerpoint guides your students to experience 4 different chemical and physical changes. The experiments that you will demonstrate are
Melting chocolate
Freaky hand
Making butter
Rainbow milk
The resource includes a final slide for students to ansser questions and review the demonstrations.
This powerpoint includes five slides to guide your student to set up a decomposition investigation in a small take away plastic container. each team of students will need a small piece of apple, paper, plastic and cloth.
Once the student have covered their materials with soil or potting mix and secured the container they will construct a table in their Science book and write predictions for the materials.
This is a powerpoint to review a chromatography investigation.
You would need to set up your own chromatography experiment with your students then use the slides to review and conclude the activity.
There are several chromatograhy investigations to be browsed on the internet. One of my favourites is the chromatograhy dancer.
This bundle is a set of Manager, Speaker and Director badge inserts that can fit into plastic name holders. The document is in Word so that you can adjust the outlines to fit your name holders.
This investigation is a lot of fun for young children.
You will need one old CD rom or DVD for each child.
Take the children outside on a sunny day. If you’re in Australia make sure that the children are wearing hats. LOL No hat no play!
Locate the Sun. Make sure that the children are standing in the full Sun.
The idea is to capture the sunlight by angling the CD rom or DVD and then shining the light into a shaded area.
I had the children stand on the oval and then shine the light onto the school’s ‘undercover’ area. There were plenty of objects like benches and bins for the children to shine their light. The area I chose also had plenty of people coming and going so the children were able to shine their light onto them.
This activity can be a be tricky and you will find many children saying ‘mine doesn’t work’.
To conclude and to ensure that every child can shine a sunbeam, I asked small groups of children to stand in the shaded undercover area while the reminder of the class sone a ‘disco’ onto them.
We then returned to class and I demonstrated on the whiteboard how to draw a ray diagram to show how light travelled from the Sun to the DVD or CD rom and then onto an object or person.
On the worksheet the children can draw themselves holding the CD rom or DVD and the object/person that they shone light onto. They can add ray arrows to show how light travelled. And finally write their own sentence about the investigation.
This powerpoint resource comes in two parts
Part One - the students are guided to use microscopes to investigate a dry soil sample on a ‘sticky tape slide’. Then they create their own soil solution in a jar. You could set this over 2 x 60 minute lessons.
Part Two - the students having left their solution to ‘settle’ for one week, then draw a diagram (to scale) of the layers in their solution using rulers to measure and magnifiers to observe the layers closely. Allow one hour.
This erosion investigation can be carried out in the school sand pit to investigate the effects of water on sand. Students can investigate what happens to a sandcastle when they pour differing amounts of water onto it.
The powerpoint details the steps required for students to conduct their investigation. Students use the 'investigation planner' to determine variables and record their measurements and findings.
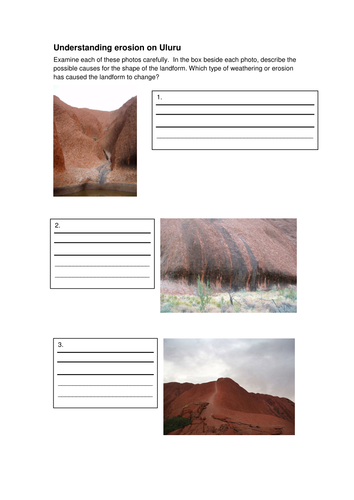
Students will examine images about Uluru to see how it has been affected by weathering, erosion and human activity. Students will carefully examine 6 images and describe the possible causes for the shape of the landform. Which type of weathering or erosion has caused the landform to change? Students record their ideas on the worksheet. Students draw a diagram predicting how the landform of Uluru might look 100 years into the future.
At completion of the written task gather the students together to share their findings.
This activity could be used as an assessment task to conclude a unit of work on erosion and weathering.
Students will learn that everyday tasks that seem easy to us are difficult for a mechanical robot to perform. Students will investigate this by using a robotic toy hand. As a class we will discuss the limitations and challenges that robots face in grasping tools and manipulating them. To conduct this lesson you will need to purchase up to 12 or 14 robotic toy hands. This can be purchased at Toys R Us for about $7(Australian dollars) each. There are plenty of youtube clips that you can show the students prior to the investigation that cover the use of robotic arms in industry and on the ISS. Once you have your equipment then you can use the powerpoint to guide the students through two investigations. Part 2 and Part 3 of this package is the worksheet to accompany the investigations.
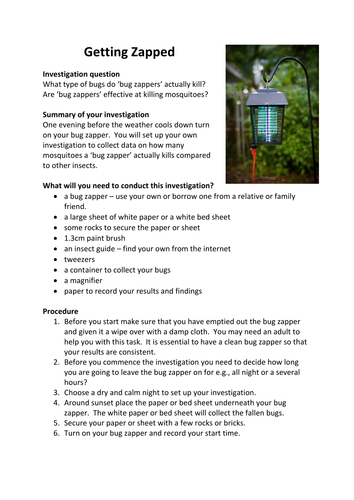
Students set up a bug zapper in the evening at their own home to conduct their own 'fair test'. All the information you need is explained on the word document - investigation question, materials, procedure, analysing and explaining the results and extension ideas.
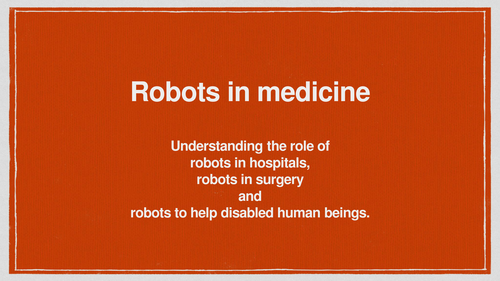
This powerpoint guide prepares students for a design task. Discuss with students what they have read or observed about robots helping to improve the quality of life of people with disabilities, or for use in medicine or in hospitals. The task is to design a robot that can help someone. Students label each of the robot’s parts or features and then write a paragraph on how their design could have a positive impact on the quality of a human’s life.
Students include a comment predicting whether humans will accept or reject the new robot and why.
This is a 15 slide powerpoint that takes students step by step through an investigation into lava viscosity. Students will work in teams to mix different viscosities of flour and water then pour their mixture onto a paper plate to investigate flow. This investigation leads into a discussion on how different volcanoes take their shape dependent on lava flow. The powerpoint concludes with a focus on the possibility of past volcanic activity in Australia.
This is a great activity to follow on and consolidate my other resource 'Jump for robots'. Students carefully examine the pictures and ONLY colour in those pictures that they think are a robot.
The students were placed in teams to view Robots in Industry from this website (cut and paste this address) . This website has been crated and designed by Crickcrick which is me an author and seller on TES
http://thescienceworkshop.weebly.com/year-6-robots-in-industry.html
Each team viewed a set of youtube clips about a type of robot or drone. Some examples are - car manufacturing, drones, marine robots, surgical robots, autonomous vehicles, NASA robots and robots for manufacturing. After viewing the video clips students work in their teams to discuss the questions on the worksheet about the role and task of robots and the positives and negatives of robots in our society and for the future.