My name is Ray Chambers. I'm a specialist in computing and have a first class honours degree in computer science. I'm currently the lead teacher of computer science at Brooke Weston Academy in Corby Northamptonshire. I have been teaching for roughly 8 years and I thoroughly enjoy my job. In 2015 I was fortunate to win the Pearson National Teaching Award for innovative use of technology. I also won the BAFTA for mentoring young coders.
My name is Ray Chambers. I'm a specialist in computing and have a first class honours degree in computer science. I'm currently the lead teacher of computer science at Brooke Weston Academy in Corby Northamptonshire. I have been teaching for roughly 8 years and I thoroughly enjoy my job. In 2015 I was fortunate to win the Pearson National Teaching Award for innovative use of technology. I also won the BAFTA for mentoring young coders.
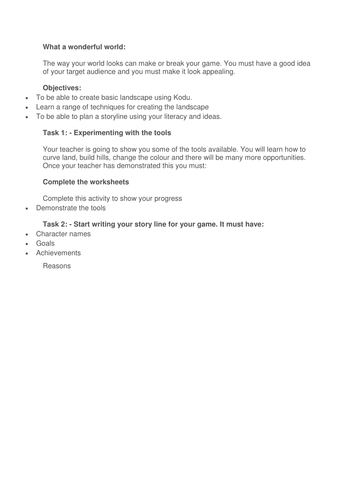
This lesson starts getting students to think about the way the world looks. Their main objectives are to learn how to create a basic landscape and to experience the techniques available.
They will look at existing games and talk about what makes them more interesting. I've included some screen shots of existing games to guide the teacher.
It starts getting the students to come up with a concept for their own game and they have a few ideas.
Teacher requires prior knowledge of how to use the landscape tools or can use YouTube videos to support.
Students to complete the worksheet to show that they're able to use the tools available and that they can come up with their idea. Homework included.
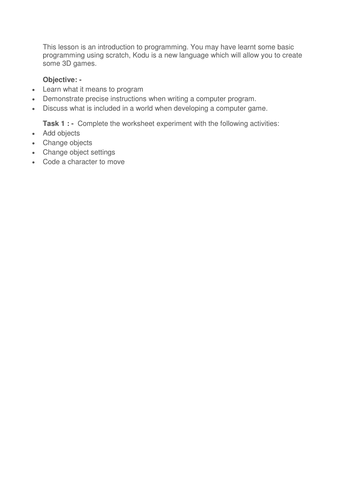
This lesson does require some prior knowledge of Kodu but it gives you structure to start delivering the curriculum and it will allow you to break down each lesson and to start teaching the students different items step by step.
There are opportunities for students to think about what is needed for a game.
There is a worksheet to help them to start thinking about what they're going to need to include in their own game.
Once you've introduced this, teach the students how to create characters, worlds, objects and how to write a simple piece of code.
Students are required to use the worksheet as they work through this PowerPoint with the teacher. This is a sample lesson to get you started and can be used for KS2 or KS3.
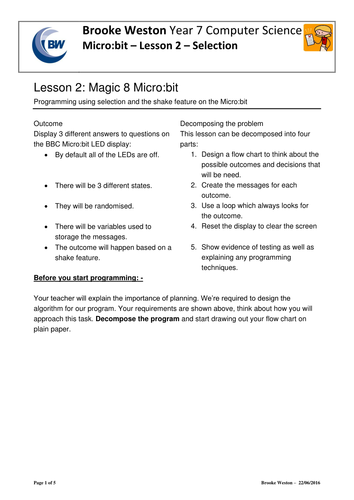
This Micro:bit lesson introduces to students how they can build a magic 8 ball using the microbit. Before they start building a magic 8 ball, students are introduced to how to use the A + B buttons and they're introduced to how to build a flow chart. They complete a simple cup of tea.
Once they've complete a flow chart they will attempt to create one for a simple A + B program.
After this they will work on a magic 8 ball. There is a video included which shows you how to do the random number generator for the magic 8 ball. This should give students the basic skills that they need for planning and it includes videos which will help them understand it.
This video is a sample of what you will see in the bank of 9 videos which will help your students get started with the Micro:bit. I hope this is useful and that the other videos will get your students started.
This video shows you how to get a light moving left and right using iteration.
These video tutorials will help you deliver the MicroBit lessons and will also leave some of the tasks open ended. I have uploaded one of the videos for free so that you can see what they're like.
The videos in this bank include: -
* Spirit Level
* Simple Maze Game
* Simple LED Lights
* Calculator - Add two numbers together using variables
* Random number generator
* Controlling how an LED moves around the screen
* A + B buttons (selection)
* How to make crossy roads on the screen
* Iteration and moving lights
All include some explanation of what has been taught and the key terms needed for programming. This has been done using the blockly editor.
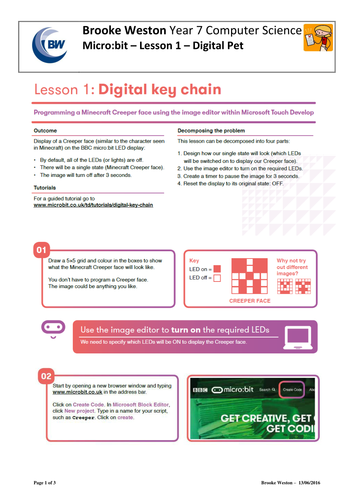
This lesson gives you a structured break down to delivering the Micro:bit lesson for the first time. I have combined this with the Micro:bit book to make the creeper face.
In this lesson: -
* reason for the Micro:bit and discussion with the students
* students given time to read health and safety instructions and feedback to the teacher
* how to get onto the website.
* pictures to show how to connect to the website
* how to download the program in 3 easy steps
* how to get the program onto the MicroBit
* worksheet with extension
* introduction to Selection
* Challenge with video
Objective: - We’re learning to identify different network infrastructures and the encryption involved.
During this lesson there are some videos to break up the lesson and teaching notes for you to have a look at. On top of this there are some activities for them to try such as creating their own encryption key. This usually makes the lesson more engaging for the students.
Content covered in this lesson: -
Topologies
Ring
Star
Bus
Mesh
Students to draw the network topologies and explain the advantages and disadvantages.
Wifi and wifi channels
Encryption using the Caesar shift and also comments on brute force.
Public and private keys used in encryption.
Objective: - We’re learning to identify the hardware and classification linked with networks.
This lesson includes notes in the teacher slides to help teachers understand the content they're delivering with links to videos and also embedded videos.
During this lesson students will learn about:
Client server models
Client-Server
Servers available
Peer to peer networks
Advantages and disadvantages
Network hardware
NIC
Wireless access points
Routers
Switches
Draw your own network diagram
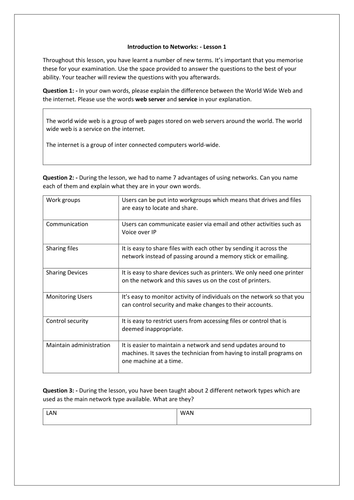
Objective: - We’re learning to explain the benefits of using networks and to identify the different transmission media available.
This scheme of work includes notes to help teachers understand the content and includes diagrams.
Key things learnt throughout this lesson include: -
What is the internet
What is the world wide web
What is a network with youtube clips to explain
Different network types with videos
Difference between a wan and a lan
Other forms including PAN / MAN / SAN and VPN
Transmission media such as UTP, FIbre optic, wireless
Two worksheets with answers
Break down of lessons including assessment : - Lesson break down included in the week plan so that you can see what students are expected to achieve. Topics covered in this unit of work: -
-Connectivity
-Hardware
-IP address
-Data Packets / Packet Switching
-Hardware
-Encryption
-Topologies
-Advantages / Disadvantages
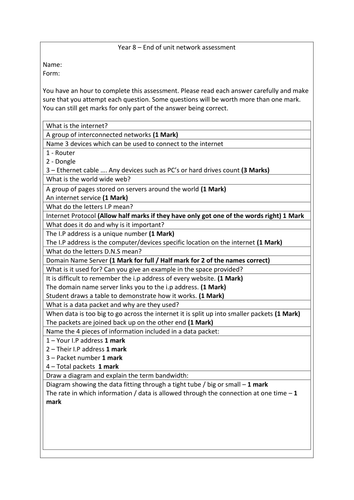
This is the end of unit assessment for key stage 3 computing unit on networks.
Students are tested on the following: -
Connectivity
Encryption
Hardware
Topologies
IP Addresses
Data Packets
World wide web vs Internet
Protocols
Diagrams
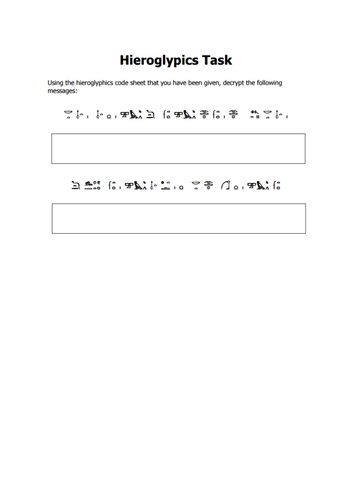
Week 5 - Encryption
Objective: - •To identify some of the data which should be kept secure from others.
•To learn some of the ways in which data is kept secure.
•To learn how unauthorised people can break ciphers and read encrypted data.
•To learn about classical encryption techniques.
Task 1 : - Come up with a list of data which would need to be kept secure.
Task 2 : - Your teacher will print out this worksheet for you. They can click here to download it.
You should use this file to help solve the message. Click here
Task 3: - You are now going to learn a little bit about brute force and the Caesar shift. •https://vimeo.com/145990347 - Watch this video and find out more about the Caesar Shift.
Complete the worksheet using the PowerPoint's: - Click here
Week 4 - Hardware
Objective: - •Know the hardware required for developing your own network
•Develop your own network using a number of different devices.
Task 1 : - Discuss the different hardware which could be used on a network. Think about the devices which you would have in your house?
Task 2 : - This worksheet should have been printed for you. You're required to make notes as your teacher talks about the difference in each device. Click here to download the worksheet
Task 3: - Plan out your network diagram on paper and then visit www.draw.io and start producing a network diagram.
Topologies
Presentation includes notes to train teachers who are very new to teaching computing.
Week 3 - What is topology?
Objective: - •Understand the difference between LANs and WANs
•Be able to give examples of each network
•Identify three different network topologies.
Task 1 : - Make notes about the difference between a WAN and a LAN network as your teacher explains things to you. This video will also be shown: - https://vimeo.com/145979347
Task 2: - Your teacher will now get you to act out 3 different networks by getting you up out of your seats. They will follow this by watching this video: https://vimeo.com/145982596
Task 3: - As a class you will come up with success criteria and produce a poster which meets the criteria. You should comment on the following:•LAN VS WAN
•STAR / RING / BUS
Useful links: •https://vimeo.com/145979347 - WAN / LAN video
•https://vimeo.com/145982596 - Topology video
Connectivity
This lesson introduces students to how we connect to the internet and introduces them to terms such as I.P address and explains what happens with traffic. They're introduced to the number of devices which are available and have to do some independent research. They're also given the opportunity to set up a blog in which they can share all of their work their teachers. If you're un-happy for your students to blog, you could always keep a progress log. The blog was used as an e-safety tool and the teacher was able to explain how to post responsibly during lessons.
•Week 2 - What is connectivity
Objective: - •Learn the meaning and significance of bandwidth
•Understand what is meant by buffering
Task 1 : - www.submarinecablemap.com/ 1.There are a number of countries which only have 1 cable connecting them to the remainder of the world. Create a Word Document and take some screen shots of these.
2.What do you think would happen if they lost their internet connection
3.Some countries have multiple connections, what would happen if one of their connections broke? Explain your reasoning.
Task 2: - Using the shape tools in word, draw a diagram of how bandwidth works. Explain it in your own words.
Task 3: - Research why we're likely to need each device on the internet. What do they do? Webopedia is a useful website for help with this.
Useful links: •https://vimeo.com/145842221 - This video will show you how bandwidth works using balloons.
•https://vimeo.com/145844751 - This video will show you how buffering works.
Final Task: - Start producing a blog post, video or poster depending on what your teacher requested. Make sure to use the keywords below•Make sure that you include information from the tasks you’ve already produced and make sure that you show all of your objectives have been met.
•Keywords to use: Bandwidth, buffering, hardware, devices, WiFi, Connection
This scheme of work covers a wide range of topics on data representation and has an assessment at the end of it which uses previous exam questions over the years. It includes step by step help and teacher notes in the presentation.
List of topics covered: -
Lesson 1: -
Students will also learn about: -
Switches
Binary
Exam questions
Binary conversion using switches
Binary conversion using division
Binary grid method
Least / Most significant bit]
Lesson 2: -
Rules for adding using binary
Showing how to add binary numbers
Diagrams to help students
Overflow information
Explanation of what overflow is
Worksheets
How hexadecimal works
Break down of how to convert into hexadecimal
Lesson 3: -
Character sets
Exam questions
worksheets
Binary to ASCII conversion
Explanation of ASCII and why 16 bit was need
Break down of why character sets are needed
Image conversion
Images and pixels - how many bits
Colour depth and formulas to work out file size
Bits per pixel
Meta data of images
Lesson 4: -
Analogue to digital compression
Sample rate - number of samples taken when converting to digital.
Bit rate - sample rate x bit depth
Estimating file size
Lossy and lossless compression: - When to use them
Check Digits - Also diagrams to show you how to convert them.
Written by Ray Chambers: - Pearson National Teaching Award winner 2015 - Innovative use of technology - Specialist in Computing
Objective: - We’re learning how to apply compression to sound and how to explain check digits.
Students will be given a break down how sound is represented. The teacher will also have some teacher notes and things that they can talk about. I’ve included a worksheet for the end of this task which tests their knowledge of the PowerPoint slides. Where possible, I’ve tried to include a diagram to explain how it works so that it’s more visual for students.
Keywords this lesson:
Analogue
Bit depth
Bit rate
Sample rate
Compression
Topics covered by this presentation:
Analogue to digital compression
Sample rate - number of samples taken when converting to digital.
Bit rate - sample rate x bit depth
Estimating file size
Lossy and lossless compression: - When to use them
Check Digits - Also diagrams to show you how to convert them.
Content written by National Teaching Award winner: - Ray Chambers 2015 - Innovative use of technology.
Objective: - We’re learning how to use data to represent characters and images.
Students will be given a worksheet to start this lesson which gets them to solve what the binary says. The answer is 'computing'. Once students have solved the question using a grid, it leads you into a conversation about how computers use binary to translate messages.
There is a lot of theory in this but there is a worksheet to complete at the end of the lesson and there are two worksheets to complete throughout.
Where possible there have been some hints and tips written in the notes.
Covered in these slides: -
Character sets
Exam questions
worksheets
Binary to ASCII conversion
Explanation of ASCII and why 16 bit was need
Break down of why character sets are needed
Image conversion
Images and pixels - how many bits
Colour depth and formulas to work out file size
Bits per pixel
Meta data of images
This resource was written by award winning teacher, Ray Chambers: National Teaching Award winner 2015 - Innovative use of technology.
Objective: - We’re learning how to add binary and develop an understanding of hexadecimal.
Students will be given a break down of how to add resources together. Where topics may have been a little tricky, I have included notes in the Powerpoint slides to help new teachers. I've tried to include hand drawn sketches in the presentation.
This resource includes worksheets and answer sheets. There are two activities to complete and this lesson could take you across two lessons with the answer sheets and discussion.
Covered in the slides: -
Rules for adding using binary
Showing how to add binary numbers
Diagrams to help students
Overflow information
Explanation of what overflow is
Worksheets
How hexadecimal works
Break down of how to convert into hexadecimal
Content written by National Teaching Award winner: - Ray Chambers 2015 - Innovative use of technology.
Lesson explaining how Data representation works. There is a PowerPoint which walks through two methods of conversion but it also specifies how to use binary. It explains to students place value and compares denary to binary. Lesson 1 in a series of 4 lessons.
Students will also learn about: -
Switches
Binary
Exam questions
Binary conversion using switches
Binary conversion using division
Binary grid method
Least / Most significant bit]
Worksheet provided
Content written by Ray Chambers - National Teaching Award Winner - 2015 - Innovative use of technology